Get ready for the first Patron-sponsored Side Quest!
We recently launched our Patreon , and one of the tier rewards we’re really excited for is the ability for our Patrons to sponsor the next Side Quest. They pick the game system, the theme, and get to name a character or two. We create a Side Quest around their idea, and now everyone gets to enjoy this free D&D adventure! Plus, Patrons receive a downloadable version of all our Side Quests.
Not sure what a Side Quest is? Well, do you ever feel stuck when planning your next D&D session? Perhaps you’re tired of sending your players off into the woods with the same old bandit ambush trope, or they went in a totally random direction you didn’t expect, and now you’re scrambling for a surprise encounter to keep them busy until you can re-write your entire campaign. Enter our Side Quests! These posts include a short, free D&D adventure (or other TTRPGs!) with corresponding maps that can be easily threaded into an ongoing or one shot campaign, allowing busy DMs to throw in a random encounter at the drop of a hat.
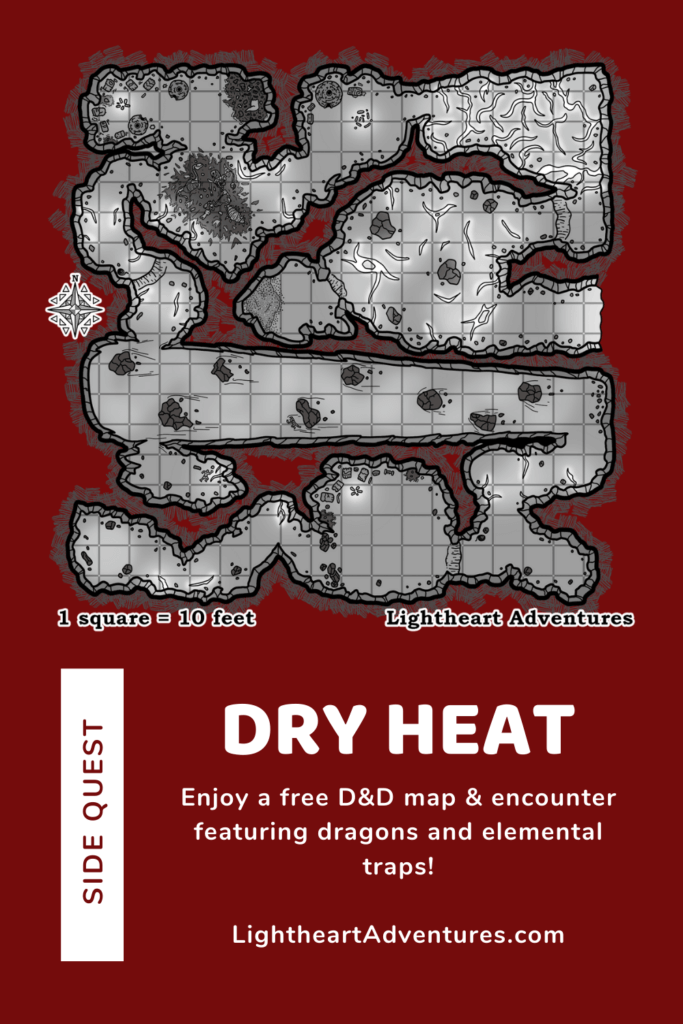
For our first Patron sponsored Side Quest, we received this theme request: “[A] Dragon Lair with elementally appropriate traps and hazards.” He also selected the name of the red dragon antagonist. We had a great time working with his suggestion, and we hope you all like it as well!
*Disclosure: This post contains affiliate links, which means if you click through one of our links and decide to make a purchase, we may earn a small commission, at no additional cost to you. As Amazon Associates, we may receive payment from qualifying purchases. You can see our full disclosure here. Thanks for supporting your favorite dungeon artists!
Summary
A young blue dragon hunts for a band of adventurers to help it successfully take back its cliff-side lair from a thieving, red dragon. The lair is also home to a clan of gnolls whose leader allied with the red dragon against their former master. Persuasive heroes could sway the gnolls to turn on their new master in favor of their old one. If the adventurers decide to help this unlikely ally, they must survive the conflicting elements of the dragon’s lair to challenge the draconian defiler and prevent their evil from spreading across the land. This side quest is intended for characters between 9 and 10.
Helpful Reference Materials
Hell hath no fury like a dragon scorned
A juvenile blue dragon by the name of Haranthrax claimed a section of coastal shore near the Sea of Fallen stars for nearly a century. While vast, her territory is far enough away to not threaten civilization but is still alluring enough for occasional adventurers to attempt to take her hoard. Gnolls defended the coastal caves Haranthrax calls home from interlopers, while she returns with large kills for the clan to feast upon. Spoils taken from the raids join the growing treasure horde. After 9 years, the gnoll shaman, Koruk, grew unsatisfied with the arrangement and hungered for carnage and the expansion of the clan. Koruk found a like-minded red dragon named Ibafarshani and bargained with her to oust Haranthrax from her lair. Ibafarshani overwhelmed Haranthrax with assistance from the gnolls and made the lair her own – her mighty presence altering the landscape for miles around. Now Haranthrax seeks out some of the very adventurers who hunt her treasure to slay the traitorous shaman and red dragon.
Plot Hooks
- A beguiling stranger approaches the party with an offer of a dragon’s horde to remove an infestation of gnolls.
- Haranthrax holds a magical item required by the adventurers and in trade requests assistance removing the red dragon from her lair.
- News of a red dragon reaches the local lord who asks the party to scout out its lair. En route, a beguiling stranger approaches the party with an odd request.
Encounters
- Haranthrax
- Ibafarshani
- Koruk, gnoll shaman
- Talas, gnoll pack lord
- Giant Hyena
- Gnolls
- Gnoll Flesh Gnawer
- Gnoll Hunter
- Maw Demons
Persons of Interest
Haranthax
A female young blue dragon ousted from her lair by the larger dragon, Ibafarshani. She lived on the coast for nearly a century while growing her power-base. The dragon enlisted a gnoll clan to protect the lands around her lair while never allowing the gnolls entry. Haranthrax is haughty yet calculating, weighing each action like a miser counts coins. While she must lower herself to ask for help, she is not overly concerned about the well-being of the party. Haranthrax has the following changes:
- Haranthrax owns a wand of polymorph that she uses to disguise herself in the form of a beautiful blue-skinned tiefling. She also wears a ring of recall (see appendix) that allows her to keep her mental stats when polymorphed.
- In addition to her normal skills, she has a Deception skill of +7 and Insight skill of +6
- She speaks Common, Draconic and Gnoll
Koruk
An aging gnoll shaman (see Appendix below) who leads the gnolls in a symbiotic relationship with Haranthrax. Koruk is a proud follower of Yeenoghu, the gnoll deity, but felt that his clan was not thriving under the blue dragon. The shaman is smarter than the average gnoll and uses that intellect to drive his clan’s path further, even if it means making deals with a larger foe.
Ibafarshani
A female young red dragon drawn to the coastal caves by Koruk and the lure of greater wealth. Imperious and sadistic, Ibafarshani plans to expand beyond the coastline and conquer other dragon territories.
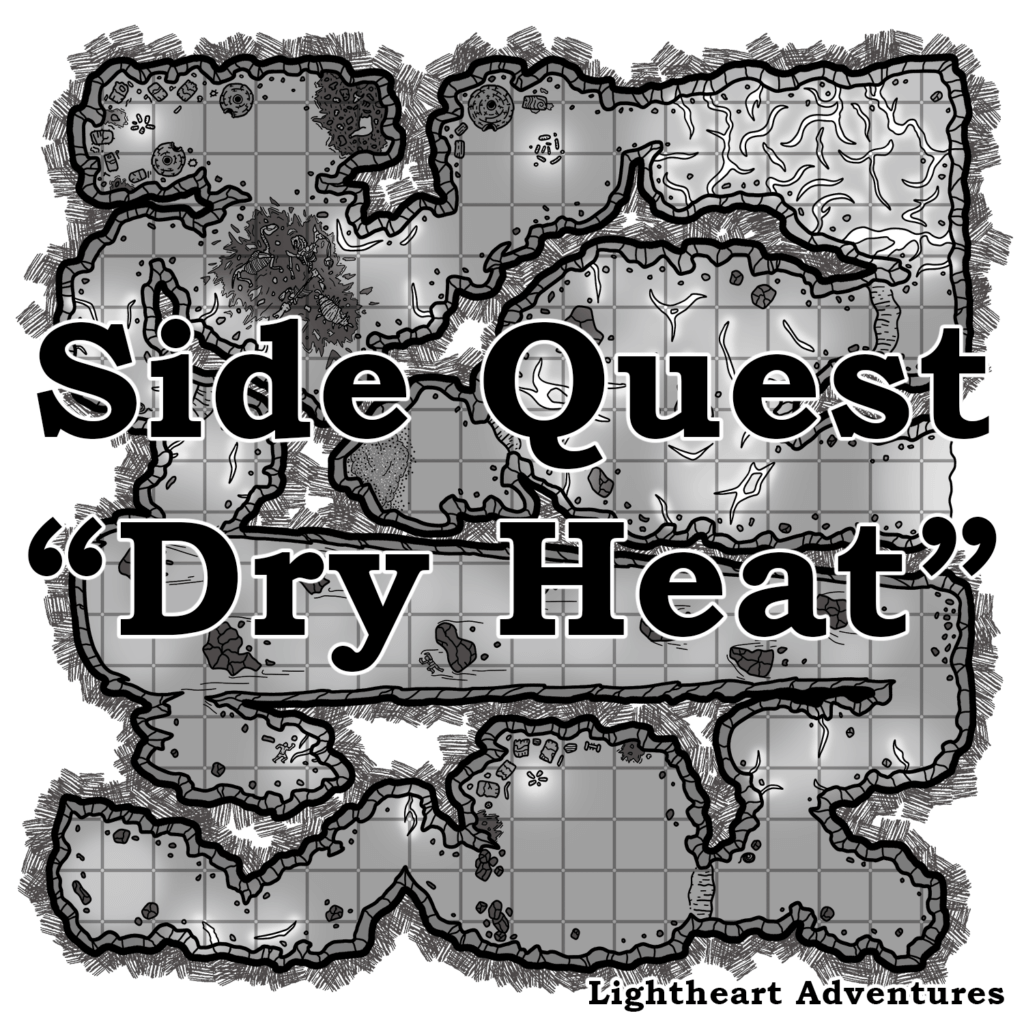
Free D&D Adventure Map: Haranthrax's Den

Region
The coastline holds both danger and natural beauty. Severe winds buffet the cliff face as impressive electrical storms rage all around, threatening trespassers. With Haranthrax gone, the climate quickly changed from one of windblown ruin to fiery devastation. The landscape tears itself apart with frequent earthquakes and lava flows from crevasses that pour into the nearby ocean.
Adventurers must tread carefully to avoid lava flows and vents of poisonous gases that litter the landscape. Reaching the secondary entrance requires delving into a shallow cave side that drops directly into the dragon’s tunnels. Haranthrax leads the party to the cave entrance but refuses to go farther, stating that “Ibafarshani is aware of my presence, and I am too weak to confront her at this time.” Observant adventurers may make a DC 20 Wisdom (Insight) check to learn that she is lying. Haranthrax would rather sacrifice others to weaken the traitors than risk her life. If pressed on the lie, she will offer a greater reward than previously mentioned.
Rooms
General Features
The cave tunnel size averages twenty feet high in narrower tunnels, but rises to forty feet in the larger chambers. Lava cracks in the wall and floors provide dim light for most rooms. Despite being underground, the heat within the tunnels is staggering.
R1. Entrance
A twenty-foot drop separates the shallow cave entrance to the main tunnel. Multiple jutting stones provide ample areas to tie rope to descend with ease. The cave floor is solid stone with occasional rocks sitting along the edges of the walls. A constant high whistling ahead can be heard from this room, drowning out any possible loud noises but making eavesdropping quite difficult.
R2. Guard Point
This large chamber is a choke point set up by Koruk. Large rock piles sit in the center of the entry, while two gnoll hunters sit on the ten-foot-high ledge overlooking the room. There is always a rotation of gnoll guards who sit near the firepit and eat. A gnoll pack lord named Talas commands the guards while loudly bemoaning the direction the clan is going under Ibafarshani. Contrary to what they were promised, the gnolls spend more time protecting the tunnels than raiding the countryside and earning what they eat. Adventurers who speak gnoll and have a passive perception of 17 or higher can hear Talas complaining to the other guards about Koruk and Ibafarshani. A worn coil of rope sits on the upper ledge and can be unwound to allow passage deeper into the caves.
Encounter: At any given time two gnoll hunters, five gnoll flesh gnawers, and Talas the gnoll pack lord guard the room.
Gnollish diplomacy: If more than half of the gnolls are slain and Talas lives, he will beg for his life in broken common. He offers to give the adventurers “magic charms” to ward against lightning if they spare his life. He will then escape out of the ceiling in R1. Conversely, if the adventurers learn about Talas’ troubles and offer to help him slay Koruk and/or the dragon, they must succeed on a DC 18 Charisma (Persuasion) check–otherwise Talas will refuse. On a success, Talas will call off the other gnolls and lead the adventurers deeper into the cave system.
Treasure: There is nothing of value among the rank belongings of the gnoll guards, but searching the bodies reveals six fulgurite charms (see Appendix below).
R3. Wind Tunnel
The sound of rushing wind becomes almost overwhelming as the adventurers move closer to a massive wind tunnel. This long tunnel is a remnant of Haranthrax’s presence within the lair as a sourceless zephyr rushes from west to east. At random intervals, massive static lightning shocks crackle between the boulders. Moving into the wind counts as difficult terrain. The wind abates significantly once past the northern exit, which leads to a ten-foot ledge separating the path forward. A coil of rope resides near the precipice and can be used to scale the shear wall if reached. A successful DC 16 Strength or Dexterity (Athletics/Acrobatics) check is needed to climb the wall without the aid of rope.
Lightning surges: Static electricity generates between the boulders and discharges when the energy overloads. Roll a d6 any time a character moves within ten feet of a boulder. On a 6 lightning bursts forth, and the character must make a DC 15 Dexterity save. On a failure, the character suffers 2d8 lightning damage, or no damage on a successful save. Any characters wearing full metal armor roll the Dexterity save at disadvantage.
Treasure: Two corpses lie on the ground, untouched by the gnolls due to the overwhelming wind and lightning. The elf corpse in the tunnel holds 105 gold pieces in a pouch at his hip, a wooden longbow still in decent condition, eight +1 arrows, and twenty regular arrows in a quiver. The human corpse in the southern cave wears a plate of singed plate armor, one small diamond worth 250 gold pieces, and one superior potion of healing.
R4. Larder
The smell of rotting meat is overwhelming as the adventurers approach this room. An enormous offal pile litters the floor as large animal carcasses rot in the heat. Five gnolls and two giant hyenas wade through the debris searching for meat to consume, unaware of any intruders. If alerted, they run to the den (R5) to alert the other gnolls.
Gnollish diplomacy part 2: If Talas is with the party, he quickly calms the gnolls and convinces them that they are friends. Most of the gnolls prefered the rule of their old master over their new one. The players must make a DC 23 Charisma (Persuasion) check with advantage to sway the gnolls. On a success, the gnolls will rally to Talas in aid against the dragon – on a failure, they refuse to aid in the mutiny but won’t attack the party unless provoked. Talas continues with the party regardless of the outcome.
Carcasses: Any non-gnoll characters attempting to move through the carcasses must make a DC 15 Constitution save or take 2d6 poison damage on a failure.
R5. Gnoll Den
A collection of ramshackle huts and floor pallets sit in this area, with pools of detritus strewn around the edges. There is nothing of value in the huts – only foul leftovers of past meals.
Encounter: Nine gnolls, three gnoll flesh gnawers, and three giant hyenas are found in the den, and rush to protect their home if alerted to intruders.
R6. Koruk's Hut
Beyond the offal pit lies a larger, better-kept hut belonging to Koruk. A few wooden tables strewn with odd ingredients sit near a raised stone slab with runes carved into its surface.
Ritual Slab: Anyone checking the slab may make a DC 16 Intelligence (Arcana) check to determine that it powers divination spells. Spells cast using the table require no material components. If the check is higher than 22, the adventurer also learns that the table is enchanted to curse any non-gnolls who use the table with a random long-term madness that lasts 1d10 × 10 hours.
Treasure: Searching inside Koruk’s hut reveals eight fulgurite charms and a component pouch.
R7. Fissures
The heat intensity rises significantly as multiple lava seams open in the rock floor. Most of the gnolls avoid traveling this far, and any large hyenas traveling with the party refuse to go further. Past the fissures is another ten-foot-high ledge requiring a successful DC 16 Strength or Dexterity (Athletics/Acrobatics) check to climb.
Intense heat: Characters in this room must make a DC 15 Constitution save once every ten minutes or suffer +1 level of Exhaustion. Any characters who have resistance or immunity to fire damage ignore this save.
R8. The Roost
This large chamber is where Ibafarshani spends her time, and where she takes council from Koruk. Large boulders dot the space and more seams of lava emerge from the floor. A vast opening in the cave wall to the east reveals a substantial lava cascade Ibafarshani uses to protect this entrance to the tunnels.
There is a one-in-ten chance that the red dragon is not in the lair, and Koruk waits inside for her return. If taken by surprise, Koruk summons three maw demons to aid him against the adventurers. Ibafarshani returns to the cave via the eastern exit within one to two turns and joins the battle.
Encounter: Ibafarshani is difficult to surprise, even while inadvertently distracted by Koruk. Both react quickly and violently to any intruders. Koruk fights to the death but Ibafarshani will flee if reduced to quarter health and vows revenge.
Note: Ibafarshani does not take lair actions in combat.
Gnollish diplomacy part 3: If Talas is with the party, Koruk howls in fury, summons three maw demons, and commands them to attack the pack lord and any other gnolls present. This leaves the red dragon to the adventurers to handle.
Intense heat: Characters in this room must make a DC 15 Constitution save once every five minutes or suffer +1 level of exhaustion. Any characters who have resistance or immunity to fire damage ignore this save.
R9. Treasure Hoard
The combined horde of both Haranthrax and Ibafarshani lies spread out on the stone floor. Piles of coins from innumerable raids and gems the size of grapes glitter enticingly. Hidden by the wealth are two lightning-burned corpses of previous adventurers.
Treasure: The total coinage of the horde equals eleven thousand gold pieces, sixty-five hundred silver pieces, and fifteen-hundred copper pieces. Buried among the coins reside three aquamarine gems (500 gp each), one peridot (300 gp), four topaz (250 gp each), an animated shield, a frost brand longsword, and a battered and locked leather book: a tome of leadership and influence. The adventurer corpses hold one usable breastplate, a +2 greataxe, one heavy crossbow with 18 bolts, two bottles of alchemist’s fire, and one potion of speed.
Epilogue
Once both Ibafarshani and Koruk are dead or have fled, Haranthrax will be waiting outside the entrance cave still in her tiefling form. She will demand proof that one or both are dead, and once provided, she congratulates the adventurers on their success. The type of reward she grants depends on the actions of the party:
- Koruk and Ibafarshani dead: She displays an unusual emotion for dragons: gratitude. Haranthrax grants five precious stones, 3500 gp, and two magic items.
- Koruk dead but Ibafarshani flees: Grateful, but wary that the red dragon may return eventually. She grants two precious stones, 1500 gp, and one magic item.
- Koruk alive and Ibafarshani dead: Haranthrax eagerly anticipates dealing with Koruk herself and with the red dragon dead, she has all the time to make it count. She grants three precious stones, 2500 gp, and two magic items.
If the majority of the gnoll clan lives, Haranthrax adds 1000 gp to the total, stating that she won’t have to search for new servants.
Homebrew Monster Stats
Koruk, Gnoll Shaman
- Medium humanoid, neutral evil
- Armor Class: 11 (14 with mage armor)
- HP: 41 (9d8 +9)
- Speed: 30 ft.
- STR: 11 (+0)
- DEX: 12 (+1)
- CON: 13 (+1)
- INT: 15 (+2)
- WIS: 12 (+1)
- CHA: 9 (-1)
- Saving Throws: Int +6, Wis +5
- Senses: Darkvision 60 Ft, passive Perception 11
- Languages: Abyssal, Common, Draconic, & Gnoll
- Challenge: 5 (1,800 XP)
Special Equipment. Koruk carries a staff of charming and two fulgurite charms.
Spellcasting. Koruk is a 9th-level spellcaster. His spellcasting ability is Intelligence (spell save DC 14, +6 to hit with spell attacks). Koruk has the following spells prepared:
- Cantrips: (at will): vicious mockery, mage hand, mending, message
- 1st level (4 slots): charm person, mage armor, magic missile
- 2nd level (3 slots): hold person, invisibility, suggestion
- 3rd level (3 slots): enthrall, fireball, protection from energy
- 4th level (3 slots): confusion, stoneskin
- 5th level (1 slots): scrying
Rampage. When Koruk reduces a creature to 0 hit points with a melee attack on its turn, the gnoll can take a bonus action to move up to half its speed and make a bite attack.
Actions
Staff of Charming. Melee Weapon Attack: +5 to hit, reach 5 ft., one target. Hit: 3 (1d6) bludgeoning damage one handed or 4 (1d8) bludgeoning damage two-handed.
Appendix - Monster Stats
All the stats for the following monsters can be found in the Monster Manual:
- Giant Hyena: p.326
- Gnolls: p.163
- Gnoll Pack Lord: p.163
- Young Blue Dragon: p.91
- Young Red Dragon: p.98
All the stats for the following monsters can be found in Volo’s Guide to Monsters
- Gnoll Flesh Gnawer p.154
- Gnoll Hunter p.154
- Maw Demon p.137
Appendix - Magic Items
Fulgurite charms
Wonderous items, uncommon
Koruk mass-created these charms before outing Haranthrax to allow the gnoll clan easier access to the cave system. These gritty rods of fused sand fit in the palm of the hands of most humanoids. Breaking a rod causes tiny motes of electricity to fly into the air, granting the user resistance to lightning damage for one hour.
Ring of Recall
Ring, rare (requires attunement)
This simple copper ring is imprinted with a texture that resembles a brain. When worn, your proficiency bonus is doubled for any ability check you make using the insight skill. Also, you may choose not to change your mental ability scores if you become polymorphed.
We hope you enjoyed this Side Quest! From here it’s up to you to decide if you want to create a deeper story arc involving either dragon, the gnolls, or anything else you enjoyed about this encounter. We would love to know if you use this Side Quest, so please drop a comment here on the blog, on Twitter, Facebook, Instagram, or Discord to let us know how it went! If you want a printable PDF version of this Side Quest, it is available (along with our other Side Quests, maps, and more fun things) exclusively on Patreon. Lastly, if you enjoyed this adventure, consider checking out our longer campaigns and map packets on our Shop page or grab another free D&D map on our Side Quests page.
Happy Side Questing!