Do you keep a dream journal? I tend to keep my note app ready for the random chance I’m struck by inspiration past midnight. Recently I woke up one night, wrote three words in my app, and promptly fell back asleep. The next morning I opened my app and found “Spellzog’s danger emporium”. I couldn’t begin to tell you what I was dreaming that night, but I knew I had to do a Side Quest based on this prompt! With that in mind, I hope you all enjoy this free D&D mini dungeon: Spellzog’s Danger Emporium!
For those of you who are new to our blog, Welcome! We post a monthly Side Quest, which are short, free TTRPG encounters with corresponding maps that can be easily threaded into an ongoing or one shot campaign, allowing busy DMs to throw in a random encounter at the drop of a hat. Our Legend tier allows our Patrons to pick the game system, theme, and name a character or two in an upcoming Side Quest. We create a free adventure around their idea, and now everyone gets to enjoy this free D&D mini dungeon! Plus, Patrons receive a downloadable version of all our Side Quests.
Disclaimer: This post contains affiliate links, meaning we may receive a small commission from qualifying purchases if you click on our links, at no additional cost to you. As Amazon affiliates, we may earn from qualifying purchases. You can see our full disclosure here. Thanks for supporting your favorite dungeon artists!
Reference Resources Needed
Free D&D Mini Dungeon: Spellzog’s Danger Emporium
History
Zog was once a simple ogre working as the muscle for a ruthless bandit group. One day, Zog found a book covered in ratty leather after a successful raid on a wealthy caravan. The other bandits thought it was trash, and let Zog puzzle over the weird script inside by himself. That night, the book spoke to Zog. It whispered promises of power and wealth into his dull mind. Zog didn’t understand most of it, but he liked that the talking book was being friendly to him.
Over time the sentient spellbook’s insidious nature emboldened Zog, raising his intelligence (slightly) and causing him to reconsider his lot in life. The ogre questioned his position, leading to a confrontation with the bandits’ leader. With the aid of the spellbook, Zog slew their leader and took control of the remaining bandit crew. Zog renamed himself Spellzog and, emboldened by position and power, began to follow his dream of entrepreneurship. This was not the action the bandits or the spellbook anticipated.
Overview
Spellzog runs a “danger emporium” that caters to those brave or foolish enough to enter. With the help of his sentient spellbook and a captured gnome architect, Spellzog created a plethora of traps within a bandit hideout to entice adventurers to his “business”. Corpses raised with the power of the spellbook guard sections while the bandits act as maintenance crews, replacing and resetting traps as needed. Most of the ogre’s inventory belongs to deceased explorers who failed to avoid the traps, but those who do survive find Spellzog to be surprisingly cordial. As long as no one seeks to take his book or treasured architect, Spellzog is content to provide “a necessary service to the public ”.
Plot hooks
- The family of the kidnapped gnome architect will pay 250 gold pieces for their safe return.
- Spellzog’s associates stole a treasured heirloom from a past victim, and now the item’s heir wants it back. The ogre is willing to trade it for information regarding new kinds of traps.
General Features
Spellzog’s cave is a mish-mash of architectural design, melding rough cavern walls with sections of worked stone rooms. Rooms have 15- foot high ceilings to accommodate Spellzog’s size, and doors are made of metal-reinforced wood. Most rooms have wall-mounted torches lit to provide illumination for those traveling through.
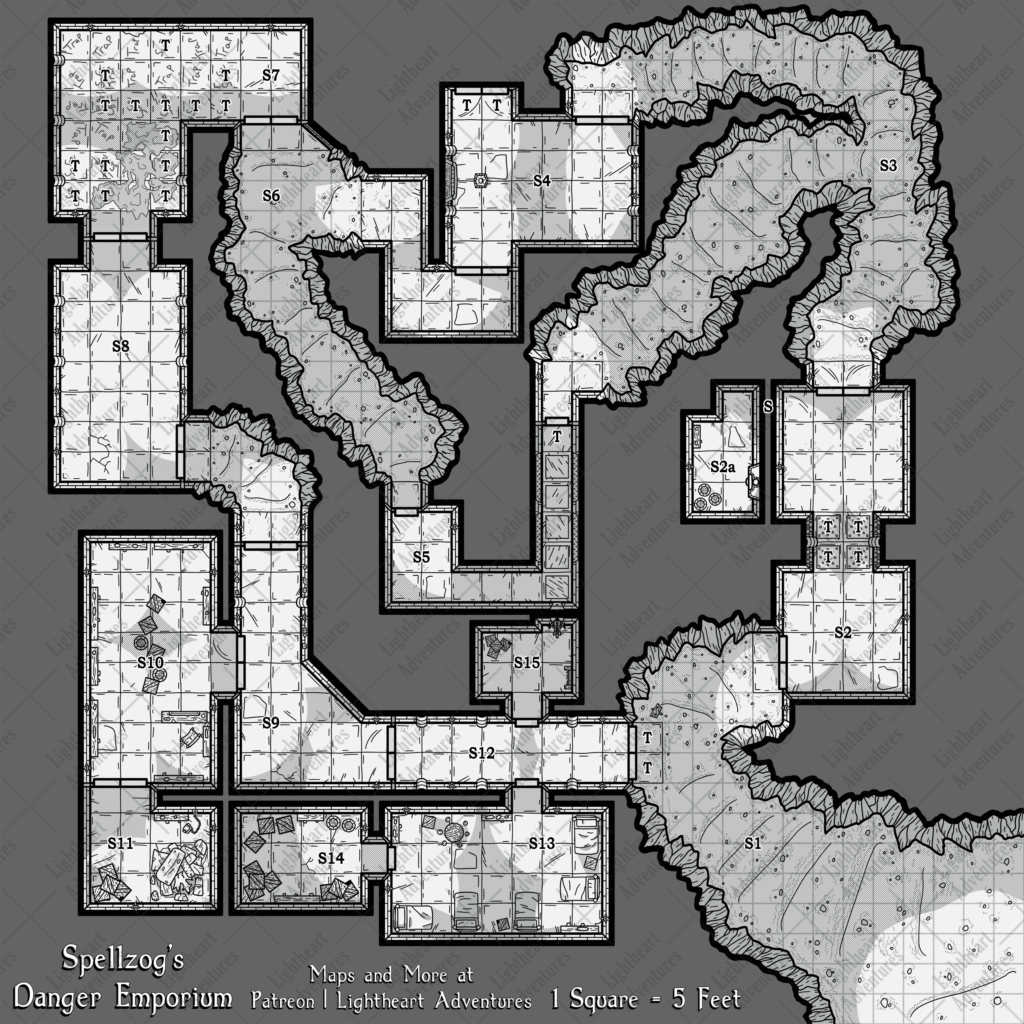
S1. Cave Entrance
A short walk from the surrounding forest reveals a shallow cave entrance. The hard-packed dirt floor slopes slightly downwards. A set of double doors rest on the left, while the tunnel curves to the right, revealing another set of doors. Pounded into the dirt sits a rough wooden sign that reads:
Spellzog’s Danger Emporium
entrance right
Employees only
entrance left
The left doors are locked, while the right doors are unlocked.
Employee entrance. Attempting to open the locked doors without the employee key causes any who touch the door to receive an electric jolt. Characters must succeed on a DC 10 Constitution saving throw to avoid electrocution, otherwise take 2d4 lightning damage. Spotting the trap requires a DC 12 Intelligence (Investigation) check, though the door will not open without an employee key.
S2. Furnace
The temperature rises as great jets of flame erupt from the walls and floor of a 10-foot wide hall in the center of the hourglass-shaped room. Two reinforced doors sit in the northern wall and are unlocked. There is nothing of value in this room.
Fire Traps. Fire shoots at quick yet regular intervals from small holes in the walls and floor. Crossing the flames safely requires a DC 15 Dexterity (Acrobatics) check. Any creature caught by the flames must make a DC 14 Dexterity saving throw. The creature takes 2d6 fire damage on a failed save, or half as much damage on a successful one. Due to the poor engineering of the trap, water (or any non-flammable liquid) poured down the floor holes causes the boiler to falter. This decreases the dexterity check DC by 4 for 1 minute as the goblin in the boiler room attempts to fix the trap.
Secret entrance. Slight scuff marks on the stone floor betray the hidden door to the flame trap’s boiler room. Noticing the hidden door requires a DC 13 Wisdom (Perception) check. Characters can open the door by pressing on a disguised tile once noticed.
S2a. Secret Boiler Room
Various tools and equipment sit around this small chamber, though the main focus is the large metal boiler embedded into the wall. An aged goblin (non-combatant) works the boiler, flipping switches and maintaining the flames in S2. If they notice the party, they surrender immediately and cease operating the boiler. If questioned, the goblin explains that they used to work for the old bandit boss, but the ogre Zog took over once he found an old book and started acting odd and renamed himself. They continue to say that most of the old crew want out and won’t attack, but to watch out for any skeletons further in. A successful DC 16 Charisma (Persuasion or Intimidation) check convinces the goblin to hand over their employee key. Once the adventurers finish with the goblin, they run out of the cavern.
Treasure. Searching the tool cabinets reveals three flasks of oil, a tinderbox, and tinker’s tools.
S3. Cavern Fork
After leaving S2, the worked stone floor and walls give way to a rough cavern, as though the room is incomplete. A fork in the tunnel splits into two paths: one to the south and the other to the north. At the ends of both tunnels sit doors worked into stone. Both sets of doors are unlocked.
S4. Plinth Room
Wood doors open into a spacious stone chamber. A rough stone plinth sits near the back of the room, in front of a carved stone relief on the wall. Two sets of reinforced doors sit on either side of the plinth. Six intact skeletal bodies lie scattered upon the otherwise suspiciously clean floor. The southern door is unlocked.
Plinth trap. An apple-sized green gem sits atop the stone plinth. Casting detect magic on the gem reveals an aura of necromantic and illusion magic. Upon closer inspection, the gem is simply a large rock enchanted to appear more valuable. Touching the gem causes the six skeletons in the room to rise and attack anyone within the room.
Stone bas relief. A crude message carved in common is visible upon the bas relief:
Right is trap
Left is safe
False door. The doors set into the northern wall are permanently sealed and enchanted to electrify any who touch its surface. Any creature that touches the doors must make a DC 14 Constitution saving throw. The creature takes 1d10 lightning damage on a failed save, or half as much damage on a successful one. Spotting the trap requires a DC 12 Intelligence (Investigation) check.
S5. Long Hall
Carved holes fill the walls on either side of this narrow hallway. Five sections in the floor are visibly raised and appear to be pressure plates. The hall turns to the west and ends with a 10-by-15 chamber holding an unlocked door. A single skeletal body sits by the door.
Arbalest trap. Both the wall holes and pressure plates on the floor are fake and are revealed with a successful DC 15 Intelligence (Investigation) check. The real trap relies upon creatures stepping on the floor immediately upon entering the room. This sends a small chime to the bugbear waiting in S15, alerting her to aim a heavy crossbow and fire it blindly down the hall. The first creature within the hall must make a DC 14 Dexterity saving throw or be struck by the bolt, taking 1d10 piercing damage. The bugbear fires three bolts and stops until she hears the signal again. She has total cover and cannot see or hear anyone within the hall. Adventurers with a passive perception of 16 or higher notice the real trap before entering and can avoid it.
S6. Employee Break
Stone fixtures end once more and turn to rough cave walls. Two of Spellzog’s employees, a goblin and an orc lean outside of the torchlight and chat among themselves. If they notice the adventurers first, they surrender immediately. If questioned, they reveal that in the next room Spellzog tried to set a trap, but as long as they stick to the “trap” tiles, they’ll be safe. They also share that he keeps a kidnapped gnome architect in his backroom that made the traps. Persuading the orc to hand over his employee key requires a successful DC 16 Charisma (Persuasion or Intimidation) check. Once the adventurers cease interacting with the employees, they escape out of the cavern.
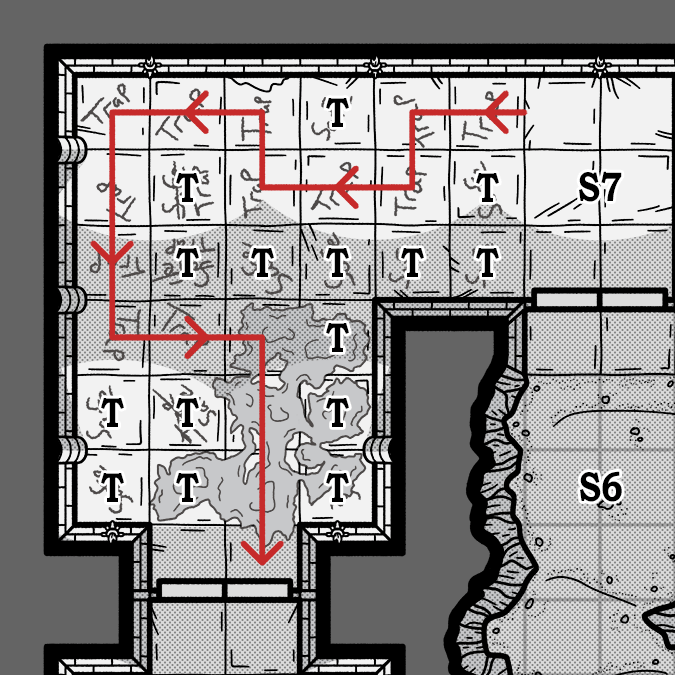
S7. Paint Room
Old red paint mars the surface of the stone tiles within this L-shaped room. The words “safe” and “trap” are crudely written upon the tiles, though a large spill entirely covers a section of tiles near the southern door. The exit door to the south is unlocked.
Floor traps. Spellzog’s attempts at trickery is limited to simple reverse-psychology. Tiles marked “trap” are safe to walk upon, while “safe” tiles trigger an electrical current to discharge. Creatures that step upon an incorrect tile must make a DC 14 Constitution saving throw. The creature takes 1d8 lightning damage on a failed save, or half as much damage on a successful one. At one point Spellzog dropped his paint can and covered half of the floor, causing the employees to avoid this room when possible.
See the image below for the safe path through this trap.
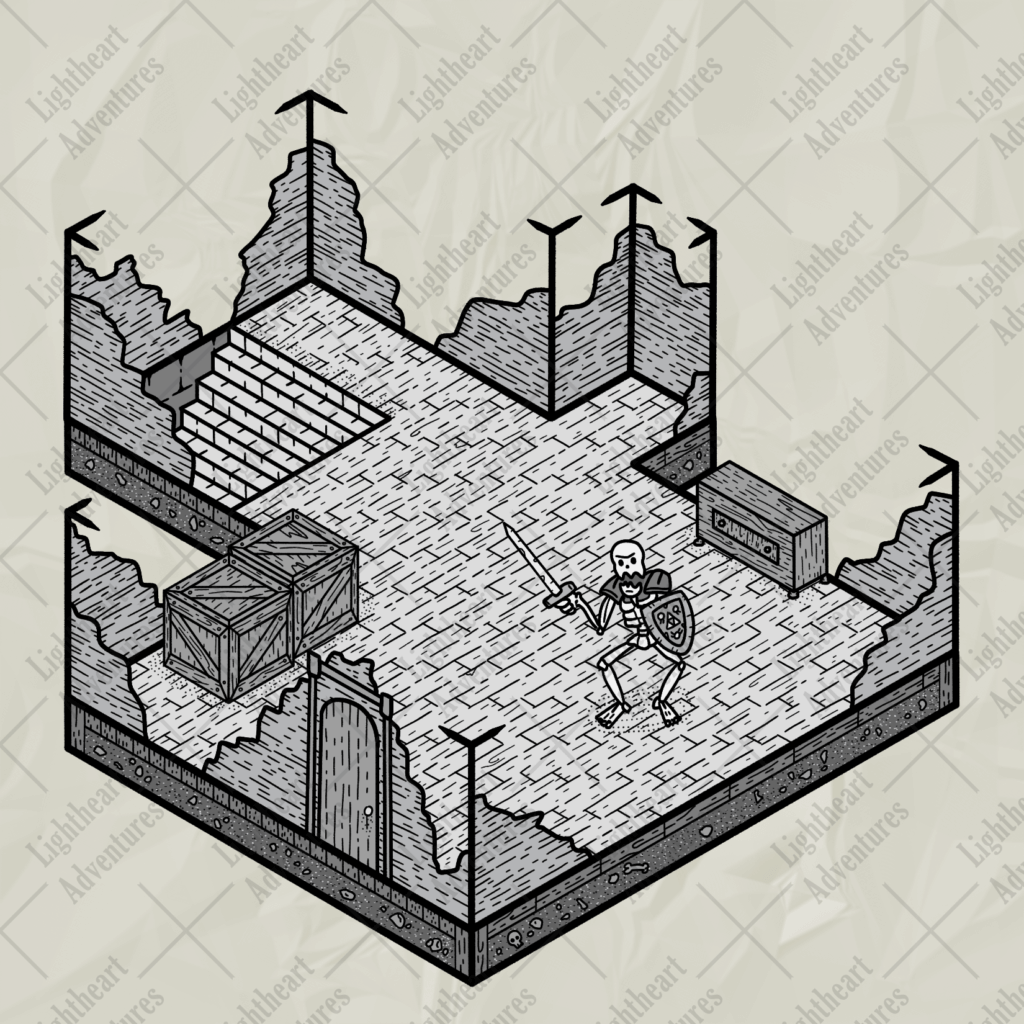
S8. The Old Boss
Four animated skeletons in ramshackle armor stand aimlessly around this chamber. One additional armored skeleton (see appendix A) of a hobgoblin appears to be more aggressive than the others. The skeletons attack any who enter the room and will pursue enemies that flee. The skeletons have little of value aside from their worn armor and weapons. The doors forward remain locked until the armored skeleton is defeated. Unlocking the doors without defeating the armored skeleton requires a successful DC 14 Dexterity check using thieves’ tools.
S9. Shop Hallway
Odd handmade posters hang from the walls along this hallway depicting various “sales” and “bargains”. A plaque installed upon the western doors reads “Spellzog’s Danger Emporium – Please enter”.
S10. Spellzog's Shop
Shelves filled to the brim with all kinds of knick-knacks and odd items line the walls in this room. Broken display cases show off pockmarked weaponry and half-empty vials of liquid, overseen by the grinning ogre behemoth sitting behind a poorly-made shop counter. Spellzog (see appendix A) greets any who enter his shop as though they didn’t risk life and limb to reach this point. Two armored skeletons are set up as display pieces showing off armor “recently acquired” by Spellzog. They do not act unless commanded by Spellzog. The doorway past Spellzog’s counter is unlocked.
Roleplaying Spellzog. The ogre’s intelligence is best described as “brutish child with a tenuous grasp on reality.” Keeping the spellbook nearby has increased his intelligence but diminished rational sense. If any character mentions the gnome architect or his spellbook, Spellzog flies into a rage and attacks. Otherwise, he maintains an air of civility and escorts the adventurers through the “employees only” section (S12) when they are ready to leave. Attentive characters can also hear Spellzog mutter to himself if he thinks no one is paying attention to him.
Shop. Despite the location, Spellzog truly means to make a living selling items scavenged from explorers. Spellzog sells most items found on the Adventuring Gear table in the Player’s Handbook at twice the normal cost. He also has the following magical items for sale:
Spell scroll (Flaming sphere) — 150 gold pieces
Potion of growth — 250 gold pieces
Potion of animal friendship — 200 gold pieces
+1 longsword — 1000 gold pieces
Wand of secrets — 1500 gold pieces
Treasure. The cases and stands hold the magic items described above, while Spellzog keeps his spellbook the malign manual with him as well as his master key. A locked treasure box behind the counter holds 345 gold pieces and opens with Spellzog’s master key or a successful DC 15 dexterity check using thieves’ tools.
S11. Spellzog's Room
Heaps of stained animal hides rest in piles on the floor in this smelly room. Wall-mounted chains reach down to a solitary desk and chair and hold a weary-looking young gnome in place.
Gnome Architect. Earldil “Earl” Downhaven (noncombatant) ran afoul of the bandits who used this cave system but remained prisoner when Spellzog staged his coup. Now he organizes and designs traps at Spellzog’s mad whimsy, often failing to explain why the ogre’s traps won’t work. Earl, overjoyed to see the adventurers, explains that he needs Spellzog’s key to escape. Nimble adventurers can pick the locks with a successful DC 18 dexterity check using thieves’ tools.
Treasure. Adventurers who rummage through the pile of hides find a ring of warmth on a successful DC 25 Intelligence (Investigation) check. Earl’s desk holds a set of cartographer’s tools. A locked treasure box within the desk holds 750 gold pieces and opens with Spellzog’s master key or a successful DC 17 dexterity check using thieves’ tools.
S12. "Employees Only"
A long hallway connecting the entrance to the various rooms used by Spellzog and his bandit employees. The doors leading to the north and south are unlocked. The eastern door is locked as described in S1. The western door is locked but untrapped, and will not open by any means unless adventurers have the master key held by Spellzog. There is nothing of value in this room.
S13. Employee Barracks
This room serves as living quarters for the remaining bandits turned employees in Spellzog’s crew. Rundown beds sit around the edges of the room between boxes of supplies and a single table. A tired-looking human (bandit) and a bugbear sit at the table and play cards. Both spring to their feet as the adventurers enter but won’t immediately attack. Neither will fight to the death and surrender if the adventurers overwhelm them. The human explains that though they work for Spellzog, he uses his book to animate the corpses of any who die inside the emporium, even fellow employees. The bugbear shares that most of the traps are easy to solve as long as you can “outthink an ogre”. Both flee the cavern after the adventurers leave.
Treasure. Rifling through the containers within the barracks yields 73 gold pieces, 243 silver pieces, and 160 copper pieces.
S14. Stock Room
Crates and barrels stacked to the ceiling fill this cramped room. Supplies of all kinds are found within the boxes, though little is of use.
Treasure. Searching the stock room yields 30 days of rations, one explorer’s pack, and a healer’s kit.
S15. Arbalest Trap Room
A bored-looking bugbear sits within this small room that has a larger-than-usual heavy crossbow mounted and sticking into a slot in the northern wall. A weapon rack holding 40 crossbow bolts sits near the crossbow ready for reloading. Any creature that triggers the trap in room S5 causes a quiet jingling bell to ring. Firing the crossbow takes an action, and due to the bolt magazine attached, the crossbow ignores the loading weapon property.
The bugbear startles if anyone enters the room, but does not attack on sight. She explains that this job isn’t what it used to be, especially since Spellzog took over. She further expresses concern for the “little gnome guy” that the ogre has chained up, but will flee the cavern once the adventurers leave.
Appendix A: Monsters
Armored Skeleton
- Medium undead, lawful evil
- Armor Class 16 (Scale mail, shield)
- Hit Points 30 (5d8+10)
- Speed 25 ft.
- STR: 15 (+2)
- DEX: 10 (+0)
- CON: 15 (+2)
- INT: 6 (-2)
- WIS: 8 (-1)
- CHA: 5 (-3)
- Damage Immunities Poison
- Condition Immunities Exhaustion, Poisoned
- Senses Darkvision 60 Ft., passive Perception 9
- Languages Understands all languages it spoke in life but can’t speak
- Challenge 1/2 (50 XP)
Actions
Rusty longsword. Melee Weapon Attack: +5 to hit, reach 5 ft., one target. Hit: (1d8 + 2) piercing damage.
Spellzog
- Large giant, neutral evil
- Armor Class 11 (Hide Armor)
- Hit Points 72 (9d10+27)
- Speed 40 ft.
- STR: 19 (+4)
- DEX: 8 (-1)
- CON: 16 (+3)
- INT: 8 (-1)
- WIS: 8 (-1)
- CHA: 12 (+1)
Senses Darkvision 60 Ft., passive Perception 9
- Languages Common, Giant
- Challenge 3 (700 XP)
Spellcasting. Spellzog is a 5th-level spellcaster. His spellcasting ability is Charisma (spell save DC 11, +3 to hit with spell attacks). He has the following wizard spells prepared:
1st level (4 slots): alarm, false life, ray of sickness, shield
2nd level (3 slots): arcane lock, blindness/deafness, ray of enfeeblement
3rd level (2 slots): animate dead, fear
Special equipment. Spellzog uses the malign manual (see appendix B) for his arcane focus and to record his spells.
Actions
Battleaxe. Melee Weapon Attack: +6 to hit, reach 5 ft., one target. Hit: (2d8 + 4) bludgeoning damage.
Appendix B: Magic Items
Malign Manual
Wondrous item, very rare (requires attunement)
The malign manual is an average-sized spellbook bound in dried animal leather. Text inside the manual is written in blood alongside finger paint-quality annotations made by oversized hands.
You gain a +2 increase to Intelligence when attuned to this item. It has the following additional properties
Grim knowledge. Different necromantic spells and augments fill the manual’s pages and increase the wielder’s power. Once per day, any necromancy spells contained within the book may be cast at one spell level higher. It currently has the following spells written on its pages:
1st level: alarm, false life, ray of sickness, shield
2nd level: arcane lock, blindness/deafness, ray of enfeeblement
3rd level: animate dead, fear
4th level: blight
5th level: contact other plane
6th level: create undead
Sentience. The book is sentient and has an insidious personality, whispering dark secrets and encouraging the holder to use its power. Its alignment is lawful evil with an Intelligence of 16, a Wisdom of 18, and a Charisma of 14. The manual communicates telepathically with any creature that attunes to it and can see and hear normally out to a range of 60 feet.
Personality. The malign manual’s ultimate goal is to take control of an army of the dead using the necromantic rituals within. The book whispers its desires to the holder when both are alone. Conflict arises if it is ignored or its power goes unused for too long, as the book saps the strength from the holder.
Curse. When attuned to this spellbook, replace your ideal trait with the following: “It’s a shame to let perfectly good corpses go to waste”, causing you to feel the urge to reanimate any corpses you come across. Refusing to animate corpses triggers a DC 14 Wisdom saving throw. Success allows you to ignore the urge, while failing the save causes you to suffer 1d4 levels of exhaustion. Reanimating corpses or taking long rests as needed reverses this exhaustion penalty.
Wrap up
That does it for this free D&D mini dungeon Side Quest! Did your adventurers buy a bunch of gear from Spellzog and make a new friend? Or did they rescue Earl and close down the Danger Emporium permanently? Let us know in the comments or on our social media pages
Thanks for dropping by! We would love to know what you thought of our Side Quest, so please drop a comment here on the blog, on Twitter, Facebook, Instagram, or Discord to let us know how it went! If you’d like access to more maps and content, including downloadable PDFs of our adventures, check out our Patreon. We’re able to do what we do because of all our amazing Patrons!