It's Side Quest Time!
Do you ever feel stuck when planning your next D&D session? Perhaps you’re tired of sending your players off into the woods with the same old bandit ambush trope, or they went in a totally random direction you didn’t expect, and now you’re scrambling for a surprise encounter to keep them busy until you can re-write your entire campaign. Enter our Side Quests! These posts include a short, free D&D map (or other TTRPGs!) with corresponding encounters that can be easily threaded into an ongoing or one shot campaign, allowing busy DMs to throw in a random encounter at the drop of a hat.
We are really excited to share these short encounters with you, and we would love to hear what you think of them! These Side Quests are free of charge thanks to the support on our Patreon page, where you can also pick up a downloadable version of this and all of our other Side Quests. Be sure to tag us when you use or share this Side Quest!
*Disclosure: This post contains affiliate links, which means if you click through one of our links and decide to make a purchase, we may earn a small commission, at no additional cost to you. You can see our full disclosure here. Thanks for supporting your favorite dungeon artists!
This week’s Side Quest features a harrowing adventure for your mid-level, grave-robbing, treasure-hungry adventurers. Welcome to the Tomb of Jhem-al-Zeb Kumoni Arhkanan. Best suited for adventurers level 11 – 15.
Reference Resources Needed
The Tomb of Jhem-al-Zeb Kumoni Arhkanan
The High Lord of Elrah, divine anima of the earth’s tomb lies beneath waves of shifting sand. Trapped underground for centuries, now only broken and weather-worn stone obelisks mark its location. The only known (yet unreliable) method of reaching the tomb entrance is through twisted cave systems crawling with monstrosities sheltering from the sun. Occasionally the sand dunes fall back and leave holes in the ceiling closer to the main tomb. This allows a brief time frame for bold plunderers to plumb the depths. Unknown to all but a few, Lord Kumoni made sure his tomb had its defenses ready for any daring to enter.
Plot Hooks
- The adventures must locate a treasure hidden within the tomb to trade for information from a high-ranking power broker.
- The sands part underneath the feet of the party as they rest, dropping them directly into the entry hall.
- An ancestor of lord Kumoni needs bodyguards while locating the tomb and retrieving an artifact.
Encounters
- Lord Kumoni
- Mummies
- Tomb Guardians
- Swarm of dust beetles
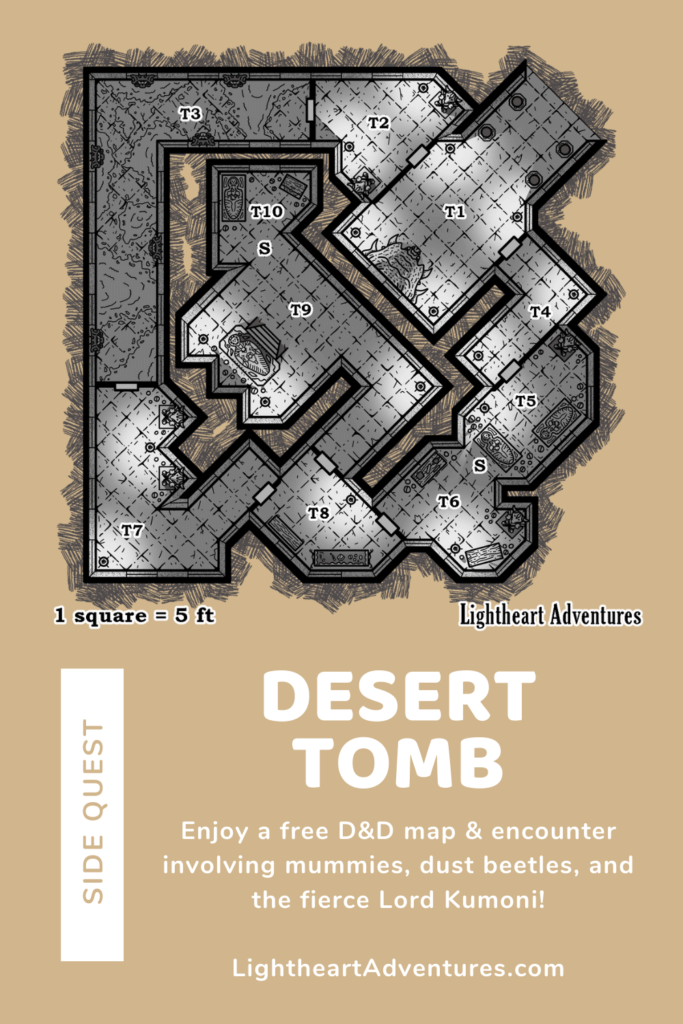
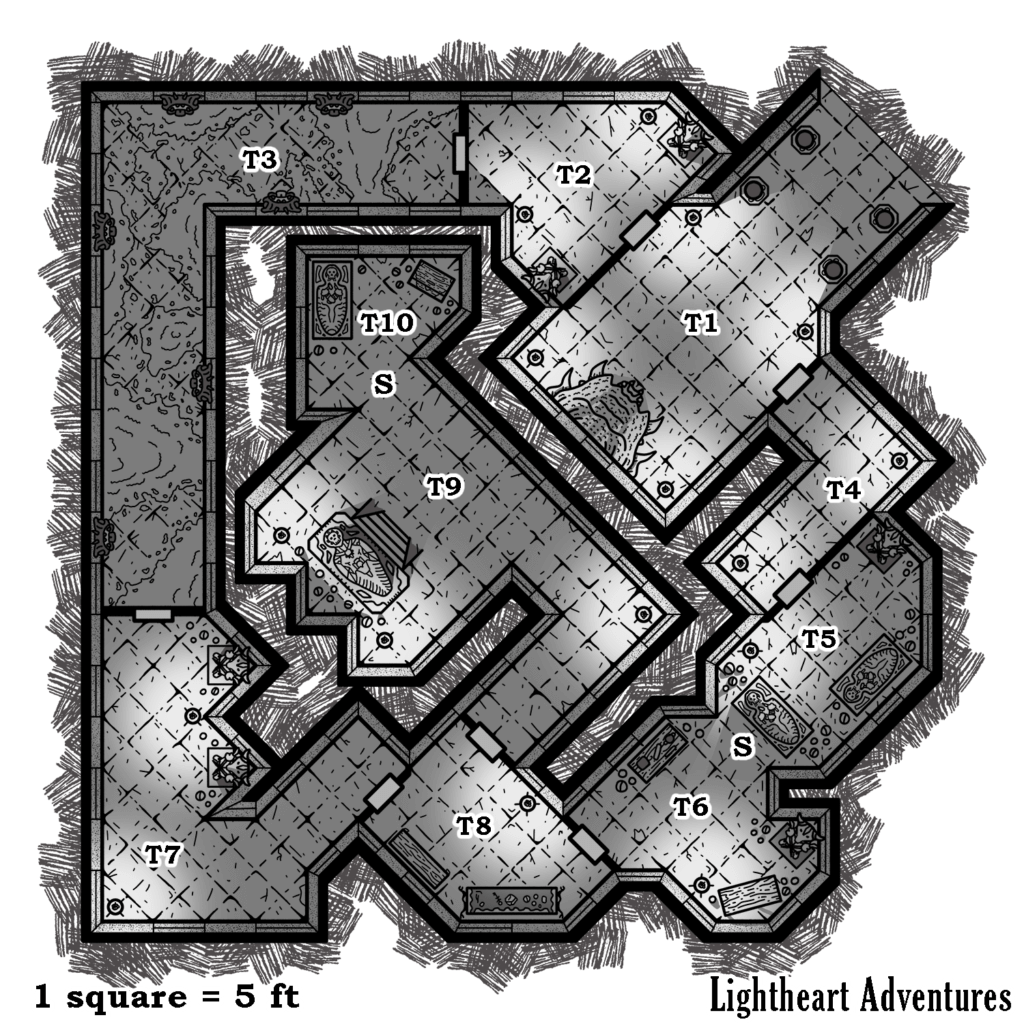
Free D&D Map: Lord Kumoni's Tomb
Caves
Far to the northeast lies the Elrah Ridge. Small cave systems riddle the low peaks that allow all manner of creatures to escape the desert heat. Intrepid explorers guided by locals can find a path towards the tomb, though traversing the system is perilous at best. The caves are home to giant scorpions, and two clans of gnolls and thri-kreen battle for resources amid the nearby dunes. Assisting one faction with their offensive could lead towards safe passage into the caves. Journeying into the dark tunnels takes 1-2 days of cramped travel before the natural walls give way to worked stone.
Rooms
General Features
The entire tomb is made of solid stone with twelve-foot high ceilings. All doors are made of smooth stone and easily open unless otherwise noted. Most rooms have small torch braziers sitting on the floor but few are lit.
T1. Entry Hall
The air is heavy with dust and the only sound comes from the footsteps of those who enter. Floor to ceiling ornate pillars depict the lives of the interred. Mounted directly across from the entrance is a gargantuan desert beetle–its shiny carapace dull in the darkness.
Pillars: If the party succeeds on a DC 16 Intelligence (History) check or if they have a guide, they learn that the tomb belongs to Lord Kumoni and his closest retainers. They also learn that any who disturb the crypts face grave peril: more specifically, touching the desert beetle bestows a curse.
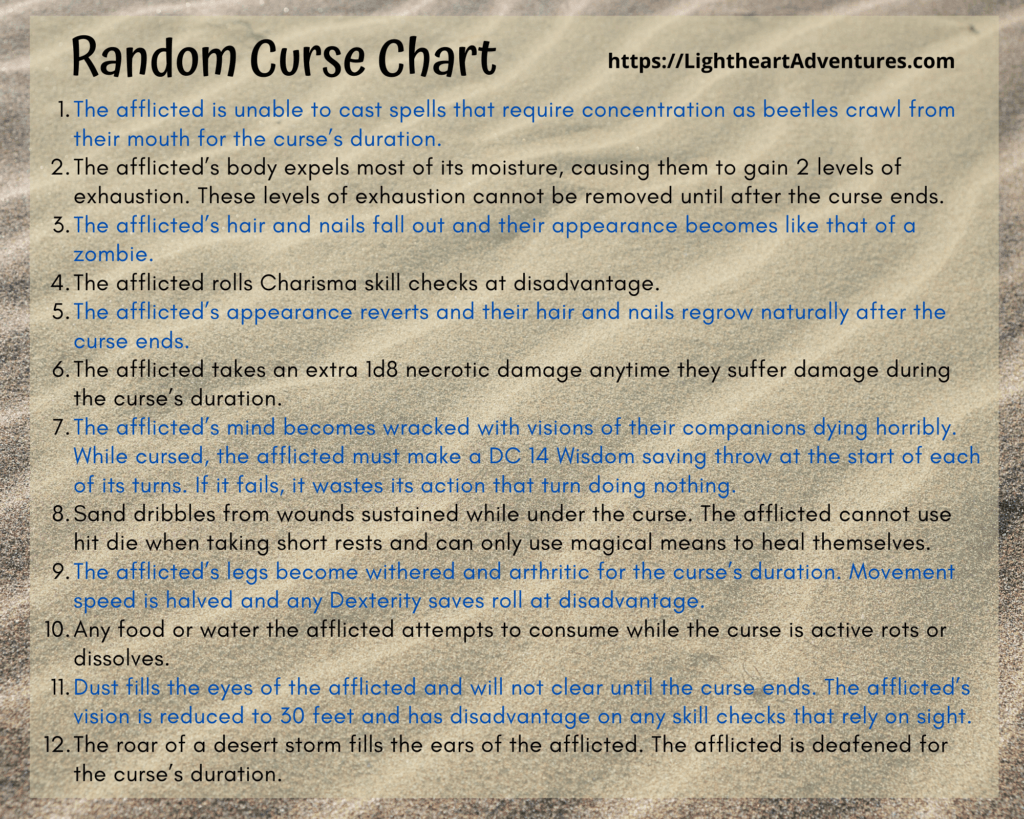
Mounted Beetle: Gilded segmented plates cover this antique beast with six luminous emeralds replacing its eyes. Prying the emeralds out of the socket requires tools and a successful DC 13 Strength check per emerald. Each gem is worth 100 gold pieces. For every emerald removed the gem’s holder must make a DC 18 Wisdom save or become afflicted with the bestow curse spell cast at 5th level. See below for curses. If one creature endures six concurrent curses, they must succeed on a DC 18 Constitution save or be slain outright. Casting remove curse ends the curse on one emerald while casting dispel magic (DC 15) removes all magical effects.
T2. Guardroom
This simple room holds two tomb guardians (see appendix): 8 foot tall stone statues depicting bull-headed men standing at attention. These massive animated sentry statues were left to protect the tomb. They remain motionless unless attacked or if anyone attempts to open the doors leading to the next room (T3).
T3. Sand Trap
Sand piles cover most of the floor in this long, elbow-shaped room. Grotesque bug-like stone apertures embedded in the walls sit seven feet off the floor and slowly dribble sand fleks. The floor in this room counts as difficult terrain.
Trap: As the adventurers walk past the first aperture, the door behind them slams shut, held by an arcane lock spell. Each aperture pours fine sand into the room once the door closes. Destroying an aperture blocks the sand stream, though if not quickly remedied, the entire room fills and everyone within begins suffocating. The room fills within 4 rounds, but destroying an aperture will add another round to the timer. Each aperture has an AC of 17 and 20 HP.
Note: Adding two turns per destroyed aperture is an optional adjustment if you don’t intend to kill your whole party.
Stone doors: Both sets of doors in this room seal by an arcane lock spell. A successful DC 22 ability check is needed to push the doors open or unlock them with thieves’ tools.
T4. Hallway
The walls of this hallway depict the life of Lord Kumoni. A successful DC 16 Intelligence (History) check reveals that while he was beloved, his search for immortality consumed his later years. Crumbling sections of the wall do not reveal what became of Lord Komoni’s quest.
T5. Minor tomb: Multiple embalming jars are strewn about the floor. Searching inside reveals noxious chemicals and unidentifiable matter. Two gilded caskets sit against the walls watched by a bull-headed statue. Opening the caskets requires a successful DC 15 Strength (Athletics) check, revealing mummified corpses within. Both caskets contain Mummies that attack when investigated.
Note: For a fun “Abbott & Costello” moment, allow the second mummy to rise from its casket silently as the adventurers are searching the first casket!
Secret switch: A switch hides inside the casket furthest from the door. Finding the switch requires a DC 16 Intelligence (Investigation) check. Activating the switch causes the nearby wall to recede, leaving a path into the workshop (T6).
Treasure: Buried with each corpse is 250 gold pieces worth of decorative jewelry. Five jars of embalming fluid double as vials of acid (Player Handbook pg. 148)
T6. Workshop
More embalming jars fill the room, causing an overwhelming odor of pungent chemicals. Strange metal tools sit on preserved wood tables alongside bolts of linen bandages. A single tomb guardian sits silently in the corner and attacks any who attempt to enter the next room (T8). Two swarms of dust beetles (see appendix) sit inside multiple jars and attack if disturbed.
Wall switch: A small lever next to the statue causes the wall leading into the minor tomb to recede or expand.
Treasure: Three acidic jars of embalming fluid sit on the floor. A poisoner’s kit rests on the table closest to the tomb guardian.
T7. Gallery
Two inanimate statues stand guard over this chamber, while obsidian plates hang from the ceiling against the walls. Each plate weighs over 500 lbs and chronicles Lord Kumoni’s achievements. Most info is trivial but succeeding on a DC 20 Intelligence (History) check reveals that Kumoni’s priesthood discovered the secrets of immortality through chemical embalming. Three swarms of dust beetles hide in the jars at the feet of the statues and attack if they sense any noise.
Curse: All living creatures in the room must make a DC 18 Wisdom save or become afflicted with the bestow curse spell cast at 5th level if any slab breaks. See the random curse table for effects.
T8. Priest's Room
Two tables occupy this room: one wood and simply made, the other crafted from obsidian with gold accents. Ancient script covers the walls, but nothing is translatable.
Treasure: Multiple gold ornaments rest upon the obsidian table, including a set of moldy priest vestments, a gold rod worth 120 gold pieces, and two jars of acid. A hidden compartment underneath the simple table hides a lead box containing a headband of intellect. Discovering the compartment requires a successful DC 22 Intelligence (Investigation) check.
Curse: Each creature taking an item from the obsidian table must make a DC 18 Wisdom save or become afflicted with the bestow curse spell cast at 5th level. See the random curse table for effects.
T9. Grand Chamber
The central chamber of the tomb holds the massive sarcophagus of Lord Kumoni. The braziers behind the dais glow softly and provide dim light in the chamber while multiple embalming jars rest behind the sarcophagus. Lord Kumoni (Mummy Lord) rests inside the sarcophagus and leaves it once the adventurers enter the room. The chamber doors magically seal as Kumoni rises and prevent any from escaping his wrath. Three swarms of dust beetles hide inside the jars near the sarcophagus. The door unlocks once Lord Kumoni drops to 0 hit points, but his curses remain until his heart is destroyed with fire or radiant damage.
Secret door: A secret passage hides the entrance into a vault neighboring this room. Adventurers succeeding on a DC 18 Wisdom (Perception) check notice the irregularity in the stone wall. The door swings open easily.
Treasure: Lord Kumoni wears a jewel-encrusted mantle worth 500 gold pieces. Inside his sarcophagus rests an ebony holy symbol worth 250 gold pieces.
T10. Vault
This room contains a small casket and a wood chest reinforced with gold bands. Marvelous gems embed the surface of the casket and removing them requires tools and a successful DC 14 Strength check. The total amount of the gems removed equals 2500 gold pieces. Removing the lid of the casket requires a successful DC 16 Strength (Athletics) check, though the only thing inside is a small body bound in wrapping.
Treasure: The chest is neither trapped or locked. Inside is 1500 platinum pieces, a large ruby worth 1000 gold pieces, and a ring of three wishes with a single wish left.
Curse: Removing gems or opening the casket causes the holder to make a DC 18 Wisdom save or become afflicted with the bestow curse spell cast at 5th level. See the random curse table for effects. If Kumoni’s heart is destroyed the curse no longer functions.
Monsters
All of the stats for this side quest’s monsters can be found in the Monster Manual, with alterations used below.
Tomb Guardian
These stone statues use the stats of helmed horrors with the following changes:
- The tomb guardian’s AC is 17 (natural armor).
- False appearance. While the tomb guardian remains motionless, it is indistinguishable from an inanimate statue.
- Spell Immunity: The tomb guardian is immune to shatter, lightning bolt, and fireball.
- Multiattack. The tomb guardian makes three longsword attacks.
Mummies
These shambling monsters use the same stats as Mummies with no changes.
Lord Kumoni
Lord Kumoni uses the same stats as a Mummy Lord.
Swarm of Dust Beetles
These eerie bugs use the stats of a swarm of insects with the following changes:
- The swarm’s AC is 13 (natural armor)
- They have the undead characteristic and resistance to necrotic damage
I hope you enjoyed this Side Quest! From here it’s up to you to decide if you want to create a deeper story arc involving Lord Kumoni, the cursed beetle, or anything else you enjoyed about this encounter. We would love to know if you use this Side Quest, so please drop a comment here on the blog, on Twitter, Facebook, Instagram, or Discord to let us know how it went! If you want a printable PDF version of this Side Quest, they are all available exclusively on Patreon. Lastly, if you enjoyed this adventure, consider checking out our longer campaigns and map packets on our Shop page or grab another free D&D map on our Side Quests page.
Happy Side Questing!