Show of hands: Who loves (or has played) Mork Borg? If you’re not familiar with the game, Mork Borg is a “rules-light”, Old School Renaissance style roleplaying game that’s heavy on atmosphere and promises gruesome, heavy metal action and mayhem. The whole rulebook is 80-ish pages (including an adventure), and it’s a great system to get started quickly, as character creation takes minutes to get a fully-fleshed out craven mercenary ready to hit the table. I’m also a fan at how quick and dirty NPC statblocks tend to be, which makes homebrewing on-the-fly monsters a breeze!
Because of this, I decided I wanted to make a D&D/Mork Borg Mashup Side Quest that can be easily used with either game system. Without further ado, here’s Charnel Bridge!
For those of you who are new to our blog, welcome! We post a map from our monthly Patreon-exclusive Side Quest, which are short TTRPG encounters that can be easily threaded into an ongoing or one-shot campaign, allowing busy DMs to throw in a random encounter at the drop of a hat. Our Adventurer Level 1 tier grants access to this adventure plus past Side Quests, while our Level 2 tier allows Patrons to pick the game system, theme, and name a character or two in an upcoming Side Quest. We create an adventure & draw a map around their idea that we share on the blog!
Disclaimer: This post contains affiliate links, meaning we may receive a small commission from qualifying purchases if you click on our links, at no additional cost to you. As Amazon affiliates, we may earn from qualifying purchases. You can see our full disclosure here. Thanks for supporting your favorite dungeon artists!
Reference Resources Needed
D&D/Mork Borg Mashup: Charnel Bridge
A Side Quest for 1st Tier adventurers/scum
Background
Few merchants travel down the withered road that leads to the bridge-fort spanning the Argoian chasm. Some blame dwindling traffic upon the fort’s remoteness from larger hubs, while others whisper that fouler deeds are at play. Still, it is a desperate traveler that stands before the darkened hearth looking for passage and hospitality. Once, the fort truly was a marvel of the ages, but those days are long past. A small clan of cannibals recently overthrew (and consumed) the remaining guards in charge of maintaining the fort and use it as their den. Not every traveler is consumed as even ghouls must pay the king’s toll. Meanwhile, the clan grows fat, bold, and secure in their strength enough to strike at larger groups. It is only a matter of time before a reckoning befalls the Charnel Bridge.
Plot Hooks
- A friend of the party has gone missing, last seen traveling the long, lonesome road towards the Argoian chasm.
- A threadbare trader hires the adventurers as bodyguards while they travel to a town leagues beyond the bridge-fort. They’ll receive payment once the trader arrives safely.
- Whispers in the cold, dark reaches of night fill the ears of the hungry and desperate, drawing them to a bloody fort on the edge of oblivion.
Approaching the Bridge
A road of broken cobbles winds down towards the Argoian chasm, more than a week’s journey from civilization. Wiry, gray grass grows wild beyond the road in all directions, while the few trees close to the path reach their leafless branches to the sky. After the ninth day, the road winds back and forth upon itself down the narrow side of the chasm, while the dark bridge-fort looks on. A rotting wood drawbridge connects the fort to the base of the road. The bridge-fort itself is precariously balanced on a spur of rock jutting up from the wall of the chasm and looks as though a strong wind would push it over. The bridge beyond the fort extends into the ever-present fog filling the chasm and disappears from sight after about a hundred yards.
Sewer Lair Overview
The unnamed bridge-fort (simply known as “the Argoian bridge” to locals) stands over 50 feet tall from base to top. The foundational stone is black with mold that is pervasive within the dank expanse.
Within the past year, a clan of desperate cannibals overthrew the meager defenders and made a home within the crumbling walls. Erdmund the Gaunt leads the forsaken clan, with the goal of trapping the occasional wayward traveler in an endless buffet.
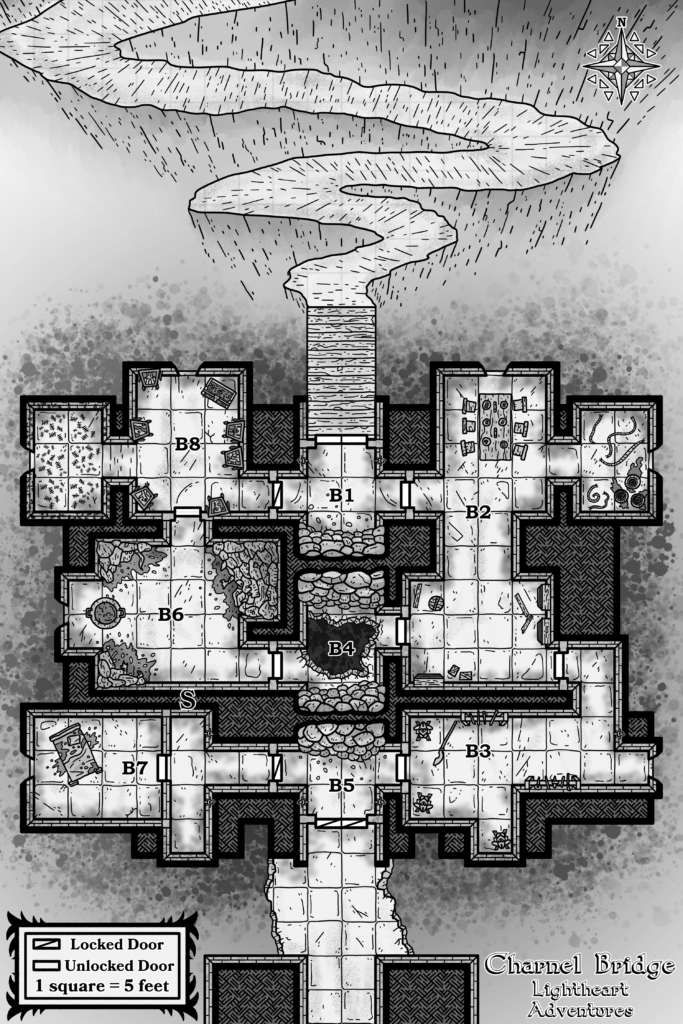
General Features
The walls of the bridge-fort are made of solid stone, its ceilings crossed with moldy timber. Each room has a forty-foot-high ceiling that is constantly covered in shadow, regardless of light. Doors are constructed with solid wood reinforced with metal bands and are unlocked unless stated otherwise. All locked doors can be opened with a key held by Erdmund the Gaunt in B6. Spaces within the “public areas” (rooms 1-5) are kept mostly clean and presentable, yet observant creatures may notice faded bloodstains beneath the broken rock and masonry in rooms B1 & B4. Rooms B6-B8 reek of sticky sweet rot as more sensitive-stomach characters must avoid losing their lunch if they spend too much time here.
The Octave. Once inside the building, all creatures (save undead, constructs, and oozes) must roll a DC 6 Wisdom Save/Presence DR8 test every 15 minutes. On a success, nothing happens and the test difficulty goes up (DC+2/DR+1). On a failure, a whistling ringing noise fills the ears of those adventurers. It’s annoying, yet manageable but cannot be heard by others until they too fail a save. Repeat this save every 15 minutes, increasing the DC/DR on successes, until the adventurers accrue three failures as the whistling grows into a cacophony, preventing clear thoughts or actions. Roll all attacks, checks, and saves/tests at disadvantage until the adventurers are clear on the other side of the bridge.
B1. Entrance
Broken masonry, open to the elements above.
Two wall-mounted oil torches flicker in the draft.
North: Large wooden double-doors with a broken lock.
East: Wooden door to the Hall.
West: Locked metal-reinforced door to the Profane Gallery. DC 22 Dexterity check/Agility DR16 test to unlock using thieves’ tools.
B2. Hall
Decaying splendor, cold and drafty. Shadows move in the ceiling above.
North: Broken window overlooking the road down the chasm, a long table set with dusty utensils.
South: Secondary chamber laden with neglected supplies unused by the ghouls. A full waterskin and an oil lamp with enough fuel for 12 hours sits on the shelves.
East: Rope fragments hang from the ceiling in clumps and lie scattered on the floor. Jars filled with rotten fruit leak upon the stone floor. Heavy metal door leading to the Old armory.
West: Wooden door to the Entrance, damaged metal door to the Unstable passage.
Two ghasts disguised as humans sit at the table and greet newcomers. They act cordially, but attack if they sense weakness or if any adventurer has three ranks from the Octave. If combat occurs, another ghast in the Old Armory joins the fight in D2 rounds.
Hungry Ghast
Pleasant company, until you notice the ravenous hunger in their eyes.
HP 8, Morale 7, Sinewy skin -D2
Dirty talons D4
- Test Toughness DR12 or become paralyzed for 1 round.
Table contents, D4:
- Unopened bottle of wine worth 5 silver.
- Unidentifiable beast. Eating the flesh deals d4 poison damage.
- Tarnished copper chalices filled with blood. Drinking from the cups heals D4 HP.
- Slimy, eye-shaped fruit. Consuming one grants a d4 to the next Octave save/test.
B3. Old Armory
Rancid tang of copper and rust. Bandaged feet shuffle across worn flagstones.
Racks bearing old weapons and armor lean against walls or creaking stands. Searching the racks for valuables yields an intact spear (d6) and a fine leather-wrapped scabbard worth 10 gold/silver.
East: Fractured window looking out over the void. A gap large enough for someone to fall through.
West: Fortified wooden door leading to the Bridge Exit, heavy metal door leading to the Hall.
Another ghast paces the floor endlessly tallying the equipment. They carry a silvered longsword that they forget to use in combat.
Forgetful Ghast
Mumbles under their breath with blood-stained lips.
HP 9, Morale 9, Rusty breastplate -D4
Dirty talons D4
- Test Toughness DR12 or become paralyzed for 1 round.
B4. Unstable Passage
Howling wind. Stone cracks underfoot, dropping loose pebbles into the chasm below.
East: Damaged metal door to the Hall.
West: Creaky wooden door to the Rancid Larder.
A twelve-foot gap stretches nearly from wall to wall. The draft caused by the opening in the floor makes jumping across difficult at best. Jumping across without climbing gear requires a DC 14 Dexterity (Acrobatics) or Strength (Athletics) /Agility DR10. Roll a D4 if a failure occurs.
- Plummet into the chasm.
- Reach the opposite side, but large stones crumble away. Increase the test DC/DR by +2 for anyone jumping across.
- Reach the opposite side, but small stones crumble away. Increase the test DC/DR by +1 for anyone jumping across.
- Reach the opposite side, but you skin your shin really hard and take D4 damage.
B5. Bridge Exit
Unbearably hot, stagnant air. Muffled sobbing to the west.
South: A massive iron rune-locked gate leading to the bridge proper. Impassible without the key held by Erdmund.
East: Fortified wooden door leading to the Old Armory.
West: Locked wood door to the Bloodied bedroom. DC 15 Dexterity check/Agility DR9 test to unlock using thieves’ tools.
Unbalanced pots. Hidden above the gate are two combustible fire pots that fall if anyone tampers with the door. Anyone next to the door must succeed on a DC 14 Dexterity Save/ Agility DR12 test or take 2d6/D6 fire damage.
B6. Rancid Larder
Overwhelming stench of cooking meat and open sores. Grim firelight beneath a bubbling cauldron. Rotting corpses of men and animals stacked towards the ceiling.
Erdmund remains here tending to a boiling cauldron of indiscernible viscera day and night. He offers a spoonful from the cauldron (inedible) to the adventurers and attacks once close enough.
Erdmund the Gaunt
Erdmund is always hungry, envying those who can sate themselves on modest meals. Somehow this incessant appetite grants him grotesque strength.
HP 15, Morale –, No armor
Blood-laced claws D6
- Test Toughness DR12 or become paralyzed for 1 round.
- Every round Erdmund is in the same room as the boiling cauldron he regains D4 HP.
Erdmund is a ghast with the following changes:
- His hit points are 48 (12d8).
- Multiattack. Erdmund makes one bite and one claw attack.
- Every round Erdmund is in the same room as the boiling cauldron he regains d6 health.
North: Sturdy wooden door leading to the Profane Gallery.
South: Hidden door leading to the hallway outside of the Bloodied bedroom. Creatures who succeed on a DC 18 Investigation (Intelligence) or Perception (Wisdom)/Presence DR13 notice the door.
East: Creaky wooden door to the Unstable Passage.
B7. Bloodied Bedroom
Empty, save for a twin-post bed with torn sheets and covered in blood.
Abandoned after a grisly murder long ago, the spilled blood beneath the bed formed into blood jelly (medium-sized orche jelly) and attacks anyone that looks beneath the covers. Hidden beneath the single pillow is a small gold ring inlaid with rubies worth 100 gold/silver.
Blood jelly
There’s always room for more.
HP 10, Morale –, No armor
Acidic pseudopod d6/rounds:
- Agility DR12 to avoid.
- Strength DR10 to break free.
North: A hidden door leading to the Randic larder. Creatures who succeed on a DC 18 Investigation (Intelligence) or Perception (Wisdom)/Presence DR13 notice the door.
East: Locked wood door to the Bridge exit. DC 15 Dexterity check/Agility DR9 test to unlock using thieves’ tools.
B8. Profane Gallery
Blasphemous illustrations, chemical stench.
Seven portraits line the walls of this room. Each one is a different vision of obscenity. The reverse of one painting is a 1st level spell scroll containing bane/a random unclean scroll.
A metal-banded wood chest sits in the corner unattended. A paint-stained ghast stares unblinkingly at a portrait of a crying figure.
Aesthete Ghast
I just need some more red paint.
HP 8, Morale 7, Sinewy skin -D2
Dirty talons D4
- Test Toughness DR12 or become paralyzed for 1 round.
South: Sturdy wooden door leading to the Rancid Larder.
East: Locked metal-reinforced door to the Entrance. DC 22 Dexterity check/Agility DR16 test to unlock using thieves’ tools.
West: Hundreds upon hundreds of tally marks cover the walls and floor. Roll a DC 12 Wisdom Save/Presence DR8 or be forced to relive the life of the tormented for d6 minutes, causing the creature to go blind for the duration.
Opening the chest: The chest is laced with explosive runes. Anyone in the room as the chest is opened must make a DC 14 Dexterity Saving throw/Agility DR10 or take 2d6 fire damage.
Chest contents, D4:
- Disturbingly deep pile of fingernails. A handful thrown on the ground acts like caltrops.
- Ten perfectly preserved portions of dried food. Each is wrapped with an immaculate red bow.
- An intact healer’s kit/medicine box with d4 uses left. A note inside simply says “Help them”.
- A +1 whip made of woven human hair.
Wrap up
And with that, our adventure across the Charnel Bridge comes to a close! Did your party survive the creepy comforts of the ghouls in charge? If you liked this D&D/Mork Borg mashup, feel free to leave a comment below or drop a comment on Twitter, Facebook, Instagram, or Discord to let us know how it went! If you’d like access to more maps and content, including downloadable PDFs of our adventures, check out our Patreon. We’re able to do what we do because of all our amazing Patron