Woah look out, Side Quests are back, baby! As a quick primer, I started a new job with WizKids earlier this year, and while I was able to keep producing maps and adventures for our Patrons, I unfortunately couldn’t manage the time or energy to update the Side Quests on the website. However, now that I’m finally getting the swing of my new job, I’m going to start uploading all the prior releases again! I’ve got five new Side Quests already produced, and to help catch up a bit with the Patrons I’ll be releasing two Side Quests a month through September. To start off this cavalcade of campaigns, I’ve got a Tier 2 D&D Adventure that sends a party of adventurers down into the sewers to thwart an undead crime lord and their unholy minions: Beware the Crimelock!
For those of you who are new to our blog, welcome! We post a map from our monthly Patreon-exclusive Side Quest, which are short TTRPG encounters that can be easily threaded into an ongoing or one-shot campaign, allowing busy DMs to throw in a random encounter at the drop of a hat. Our Adventurer Level 1 tier grants access to this adventure plus past Side Quests, while our Level 2 tier allows Patrons to pick the game system, theme, and name a character or two in an upcoming Side Quest. We create an adventure & draw a map around their idea that we share on the blog!
Disclaimer: This post contains affiliate links, meaning we may receive a small commission from qualifying purchases if you click on our links, at no additional cost to you. As Amazon affiliates, we may earn from qualifying purchases. You can see our full disclosure here. Thanks for supporting your favorite dungeon artists!
Reference Resources Needed
Tier 2 D&D Adventure: Beware the Crimelock
A Side Quest for 5th to 10th level adventurers
Background
The devil-worshiping warlock known as Orican has spent the better part of two years building a small empire of thieves beneath the streets of the city. Rather than working towards dominion of the souls of the city’s inhabitants, Orican’s goals are simple: steal magical items of importance and sacrifice them to their lord Moloch, the displaced archdevil of Malbolge. Once acquired, Orican dispels the essence of the enchanted items to empower Moloch. Over time, Moloch has sent lesser servants to aid Orican, including a pair of bearded devils and a succubus named Xissha. With these fiendish lieutenants, Orican’s mortal underlings live in fear yet scour the streets for anything that would please their lord. The recent theft of a powerful artifact (an amulet of the planes) stolen from a visiting dignitary will lead to an increase in Moloch’s power unless a group of brave adventurers locate the lair and put an end to Orican’s plans.
Plot Hooks
- A dignitary from a neighboring country puts out a lucrative bounty for the retrieval of the lost magical artifact.
- A notice on a local job board reveals that a number of individuals are putting out a call to catch a thief who is stealing magical items.
Locating the Lair
The sewer system beneath the city is sprawling and would take over a dozen lifetimes to scour each tunnel for the thieves’ hideout. Fortunately, the gang’s attention can be drawn by setting a trap using magical items. A successful DC 10 Intelligence (History or Investigation) check reveals that past victims reported to the city guard have all had personal belongings of magical value stolen from them. With this knowledge, adventurers may use their own equipment as bait, while the rarity of the item increases the likelihood that a member of the gang will attempt to steal it. A trap may be laid as simply wearing or wielding the magic item out in public, often by being as showy as possible.
- Common: Roll a d12 – On a 10 or higher the gang will try to steal the item within d8 days.
- Uncommon: Roll a d12 – On a 10 or higher the gang will try to steal the item within d6 days.
- Rare: Roll a d12 – On an 8 or higher the gang will try to steal the item within d6 days.
- Very Rare: Roll a d12- On a 6 or higher the gang will try to steal the item within d4 days.
- Legendary: Roll a d12 – On a 4 or higher the gang will try to steal the item within d4 days.
If the adventurers try to use multiple items for their trap, they may roll for each item left in the pile and can use the DC/day timeline of the highest rarity item for each roll.
Once the thieves have taken notice of the magical items, one gang member (spy) aided by two to three gang enforcers (veterans) will try to steal the items, most likely via pickpocketing within a crowded scene. An adventurer in charge of the trapped magic item will need to succeed on a DC 14 Wisdom (Perception) to notice the attempted theft in action (DC 12 for larger items), otherwise, the thief takes the item and runs while the enforcers intercept any pursuers. The gang members will not fight to the death and flee if reduced to less than half HP. If caught or defeated, the adventurers will need to succeed on two consecutive DC 14 Charisma (Intimidation or Deception) checks to pry the location of the gang hideout in the sewers. With the information in hand, the adventures may begin the hunt for the lost artifact.
Sewer Lair Overview
The nearest entrance down to the sewer lair lies within a darkened alley behind a run-down carpentry shop. A rusted iron grate opens up to reveal a worn ladder that descends 75 feet beneath the street. Once underground, the air smells predictably of sulfur and rot, and the warm, humid air seemingly sticks to skin and cloth. Moldy brown brick and mortar make up the structure of the tunnels. There are no light sources within the sewer unless stated otherwise. The ceiling rises up 30 ft overhead, or even taller in other areas as noted. Doors are made of solid iron and are unlocked unless otherwise noted.
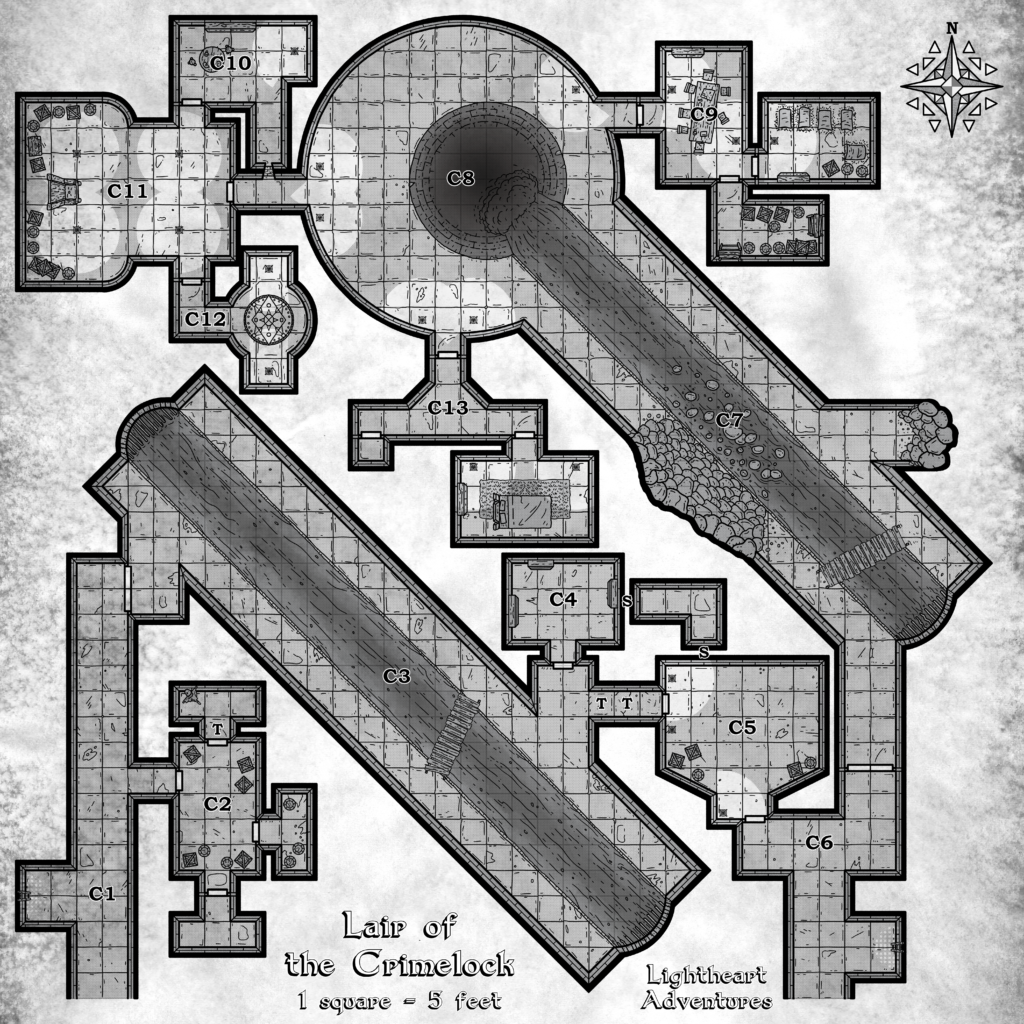
C1. Tunnel
The passageway beneath the streets runs north to south: to the north, a small hallway leads to a closed but unlocked metal door and a larger set of double doors at the end. To the south, the tunnels continue further into the distance before leading into a different section of the sewers.
Adventures who received info from the gang members know that the lair lies through the northern doors. The double doors to the north are stuck, requiring a DC 10 Strength (Athletics) check to move them. Opening the doors causes the metal to scrape against each other, releasing a painful shriek, and potentially warning others within the sewers. Succeeding on the check by 5 or more causes the doors to open smoothly
C2. City Storage
Beyond the unlocked door lies a 15 ft. by 25 ft. square room filled with partially rotting wooden crates and barrels. Three doors sit within walls to the north, south, and east. Searching the contents of the crates yields little, except for a smaller crate containing 2 sealed lanterns that can be lit without exposing the flame to gasses (handy for C3).
Northern door. The door to the east is wedged shit due to the damp conditions. A DC 12 Strength (Athletics) check is needed to pull it free. Inside is a T-shaped closet containing a simple scarecrow made of moldy sackcloth and straw. Any creatures that step foot within the space need to succeed on a DC 8 Constitution Saving throw or take 1d8 poison damage from a buildup of toxic gas within the room. Any strong gust of wind will disperse the hazard. Anyone who searches the scarecrow finds a small pouch containing 10 gp.
Eastern door. Entry through this unlocked door reveals three barrels within a T-shaped closet. Two barrels are empty but the third closest to the southern wall is sealed with two medium-sized ochre jelly inside. Opening the barrel releases the ooze, which tries to eat any organic material it can find. At the bottom of the ooze’s barrel lies a silver pendant of stained glass worth 25 gp once it is cleaned up.
Southern door. There is nothing inside this room beyond the unlocked door, aside from some roaches that scatter into the cracks in the wall.
C3. Sewer Channel
Beyond the double doors lies a 10 ft wide channel of liquified sludge and water flowing through rusted iron bars. A single rickety-looking wooden bridge crosses the span, while a tunnel sits on the other side which leads to two closed doors. The “water” in the channel flows at a quick pace and is 15 feet deep.
Natural gas hazard. The air is rife with built-up gas from the sewage flowing through the channel. The gang members are cautious with open flames when they are close to this room, as they use sealed lanterns for light. Any characters wielding a torch or sparking up a flame must make a DC 12 Dexterity Saving Throw or take 2d8 fire damage as a minor pocket of gas catches flame. Any flame tossed on the surface of the sludge causes it to briefly light in an amusing (yet disgusting) way before it is consumed.
Rickety bridge. The bridge spanning the channel is sturdy enough for one creature at a time to cross without worry. However, if two or more creatures or a single creature weighing more than 200 lbs. attempt to cross the bridge buckles and plunges into the water. Any creature that fully submerges in the sewer water must succeed on a DC 16 Constitution Saving throw or become poisoned for 1 hour.
Weakened tunnel. The 5 ft. wide hall leading to the eastern door is trapped, its structures subtly weakened to collapse on anyone who attempts to pass through. Creatures with a passive perception of 14 or higher notice the unstable foundation, otherwise anyone who walks within 15 ft. of the door needs to make a DC 16 Dexterity Saving throw, taking 4d8 bludgeoning damage on a failed save or half as much damage on a successful save as the roof collapses and blocks the path.
C4. Rotting Storage
Three shelves line the walls of this 15 ft. by 20 ft. room and contain a multitude of worn and rotting tools used to maintain the sewers. The is little of value upon the shelves.
Secret door. A small latch connected to the eastern wall opens up to an L-shaped passageway. The latch is obscured by a heavy wooden shelf that can be moved with either a DC 10 Strength (Athletics) check or if two characters each take an end. Another latch sits on the wall at the end of the L-shaped passageway and opens into room C5.
C5. Makeshift Outpost
This 30 ft. by 30 ft. room is used as a makeshift outpost for the mortal thieves in the gang. At any given time, the room is guarded by two thieves (spies), one to two enforcers (veterans) as well as the senior thief Averil DeMar (neutral human, swashbuckler). These guards fight to defend themselves, but if it seems like the adventurers will overpower them, Averil will offer up a surrender.
We surrender! Averil and the remaining thieves see the adventurers as an opportunity to beat or escape from the tyranny of Orican. Averil reveals that their leader has been demanding magic items to fuel “some sort of sorcery” The gang of thieves used to be small-time before Orican arrived and took over. Orican treats any infraction as insubordination, and allows their lieutenants to “do as they please” with the captive, often never to be seen again. Averil is not aware that Orican or their lieutenants are devils, but they suspect the worst and are willing to work with the adventurers.
C6. Tunnel
This access hallway leads to another street-level ladder that rises to a locked metal grate, as well as a set of double doors to the north. The grate can be unlocked with a successful DC 12 Dexterity check using thieves’ tools, or with a key held by Averil. The northern doors are unlocked. The hallway extends to the south away from the lair, and will only cause the adventures to become lost if followed.
C7. Collapsed Channel
The double doors open into a familiar-smelling room as another channel flows deeper into the sewer system. A wooden bridge spans the channel towards the south, allowing the gang to cross without going over the collapsed section filled with rubble.
Rickety bridge. The bridge in this section follows the same rules as the one in C3. Should the bridge break or become inoperable in any way, nimble characters may attempt to cross the channel using the stones caught on the bottom. To cross, characters need to succeed on a DC 14 Dexterity (Acrobatics) check to pass without plunging into the water.
Dispersed gas. Thanks to the better airflow from C8, the air within this tunnel, while still fetid, does not carry the same fire hazard as C3.
C8. Sewer Chasm
The sewage channel pours directly into the opening of a 30 ft diameter hole that drops 150 ft. into a churning pool that redirects the flow of water elsewhere under the city. The spacious area rises up to 50 ft. overhead and contains a few lit torches providing dim light for the room, while three hallways lead to closed doors to the east, west, and south. Two enforcers (veterans) stand guard against intruders, but they lower their guard if the adventurers approach with Averil.
Revolution. The adventurers can convince the enforcers and other gang members to take up arms against Orican and their forces.
C9. Gang Quarters
These rooms serve as a home for the few members of the gang still within the sewers and are better maintained and lit than other rooms.
Common room. This room contains a large table with dishes and tools spread across its surface. A shelf in the back corner holds a few supplies and sundry items. Three bandits and an enforcer sit and relax in this room at any given time. They attack intruders on sight unless pacified by Averil.
Barracks. The sleeping quarters for the mortal gang members. Beds are made of straw pallets with dirty blankets. A single torch provides illumination. Searching the beds with a successful DC 12 Intelligence (Investigation) check reveals two small onyx gems worth 25 gp each.
Storage. This room contains weapons and other stolen goods that the gang has taken that weren’t magical in nature. Wooden scaffolds are in place as makeshift shelves holding a number of ill-gotten goods. Searching through the room reveals 60 sq. yards of cloth in sacks (30 gp), a box containing 8 vials of perfume (10 gp each), a vial of jade dust (15 gp), and three pelts of fur (10 gp each). Searching the scaffolding also yields 3 daggers, 2 shortswords, a battleaxe, and a hand crossbow with 20 bolts. The rest of the property is of little value.
C10. Watch Post
This room is connected via a slit in the wall overlooking the hallway to C11, with its main door located in the northern wall of the throne room (C11). A simple round table resides here, topped with decaying food unsuitable for mortal consumption, while a shelf holds jar upon jar of severed humanoid tongues, trophies taken from past victims. Two to three bearded devils reside in this room.
Sentries. The bearded devils under the command of Orican take shifts watching the hallway, interrogating any who attempt to enter the throne room. If alarmed, the devils will use their long halberds to attack any intruders before retreating to C11.
C11. Throne Room
Four standing torches fill this bell-shaped room with light as Orican (Deathlock) resides upon a makeshift throne surrounded by ill-gotten gains. There are two recessed doors leading to the north and south. Orican spends most of their time within this space making demands of the gang or inspecting and disenchanting magical items. As long as they are not alerted by the bearded devils in C10 or by previous commotion, Orican is unaware of the adventurer’s entrance, as they are attempting to deconstruct an amulet of the planes that is the goal of the adventurers.
There is a 75% chance that Xissha is in this room as well, otherwise she is in her room in C12.
Treasure. Many of the items located in the crates behind the throne are cast-off remnants of disenchanted magic items that have yet to be disposed. A box of dull ioun stones lies scatted across an unfurled carpet of marvelous design while stacks of impressive looking armaments visibly rust at a noticeable pace. Not all is lost, as adventurers may find a few still-enchanted items on a successful DC 12 Intelligence (Investigation) check or by using detect magic. These items include an immovable rod, a set of gauntlets of ogre power, and a spell scroll containing vampiric touch. In addition to these magical treasures, the adventures can find 1811 cp, 501 sp, 1595 gp, a brass amulet set with a ruby worth 150 go, a small box containing 10 silver ingots weighing 50 lbs. worth 250 gp, and a wooden figure of a maiden with a vase inlaid with gold worth 200 gp.
C12. Sigil Chamber
A reinforced door to the south leads to a small round chamber with 5 ft. wide alcoves to the north and south. In the center of the floor lies an inscribed arcane circle filled with runes that almost hurt to look upon. Any creatures that understand infernal or succeed on a DC 12 Intelligence (Religion) check know it to be a summoning circle. Orican uses this room to commune with Moloch and to transfer collected essence from disenchanted items. The circle can be disrupted by damaging the floor (AC 17, HP 10), which causes pent-up energy to release. Any creatures in the room must make a DC 16 Constitution Saving throw or take 2d10 force damage on a failed save or half as much damage on a success. With the summoning circle destroyed, it would take months or longer for Orican to re-establish a connection if they manage to escape.
C13. Xisshas’ Quarters
Entry through this door leads to a long hallway with two doors on either side. The locked western door leads to an empty cell with manacles bolted into the walls. The door can be picked with a successful DC 16 Dexterity check using thieves’ tools or with the key held by Xissha. The eastern door leads to a sumptuously decorated chamber containing a large bed in the middle of the space. Two torches provide illumination while a shelf sits against the western wall which holds a veritable alchemy shop’s worth of supplies. Anyone who searches the bed find manacles bolted to the heavy wooden legs and bloodstains on the stones beneath the bed.
Treasure. The shelves contain a complete set of alchemist’s supplies (50 gp), two vials of acid (25 gp each), a flask of alchemist’s fire (50 gp), one vial of basic poison (100 gp), and a vial of truth serum (150 go, DMG pg. 258).
Locating the Lair
The sewer system beneath the city is sprawling and would take over a dozen lifetimes to scour each tunnel for the thieves’ hideout. Fortunately, the gang’s attention can be drawn by setting a trap using magical items. A successful DC 10 Intelligence (History or Investigation) check reveals that past victims reported to the city guard have all had personal belongings of magical value stolen from them. With this knowledge, adventurers may use their own equipment as bait, while the rarity of the item increases the likelihood that a member of the gang will attempt to steal it. A trap may be laid as simply wearing or wielding the magic item out in public, often by being as showy as possible.
- Common: Roll a d12 – On a 10 or higher the gang will try to steal the item within d8 days.
- Uncommon: Roll a d12 – On a 10 or higher the gang will try to steal the item within d6 days.
- Rare: Roll a d12 – On an 8 or higher the gang will try to steal the item within d6 days.
- Very Rare: Roll a d12- On a 6 or higher the gang will try to steal the item within d4 days.
- Legendary: Roll a d12 – On a 4 or higher the gang will try to steal the item within d4 days.
If the adventurers try to use multiple items for their trap, they may roll for each item left in the pile and can use the DC/day timeline of the highest rarity item for each roll.
Once the thieves have taken notice of the magical items, one gang member (spy) aided by two to three gang enforcers (veterans) will try to steal the items, most likely via pickpocketing within a crowded scene. An adventurer in charge of the trapped magic item will need to succeed on a DC 14 Wisdom (Perception) to notice the attempted theft in action (DC 12 for larger items), otherwise, the thief takes the item and runs while the enforcers intercept any pursuers. The gang members will not fight to the death and flee if reduced to less than half HP. If caught or defeated, the adventurers will need to succeed on two consecutive DC 14 Charisma (Intimidation or Deception) checks to pry the location of the gang hideout in the sewers. With the information in hand, the adventures may begin the hunt for the lost artifact.
Epilogue
Depending on the actions of the adventurers, the city rewards them a handsome fee for stopping the warlock’s crime spree and returning the lost amulet. The adventurers receive 4000 gp to be split among themselves. If Averil or any other former thieves come forward, they are treated fairly by the guard once word of the infernal coercion comes to light.
Wrap up
That brings us to the end of this adventure! I’m really glad to be back, and I can’t wait to show you all the awaiting Side Quests in store. If you liked this Tier 2 D&D adventure, feel free to leave a comment below or drop a comment on Twitter, Facebook, Instagram, or Discord to let us know how it went! If you’d like access to more maps and content, including downloadable PDFs of our adventures, check out our Patreon. We’re able to do what we do because of all our amazing Patron