For the Emperor!
It’s time for another Patreon-sponsored Side Quest! This time we are diving into Warhammer Wrath and Glory. If you’re new around here, our Legend tier allows our Patrons to pick the game system, theme, and name a character or two in an upcoming Side Quest. We create a free adventure around their idea, and now everyone gets to enjoy this free Warhammer Wrath and Glory one-shot! Plus, Patrons receive a downloadable version of all our Side Quests.
For our fifth Patron sponsored Side Quest, we received this theme request: Kurtz, a former Colonel, has gone rogue and attempts to form a new Utopian society for the Warhammer Wrath and Glory game system. Basically, they wanted an “Apocalypse Now” feeling for their adventure. I had never seen the movie before, so this week presented a unique challenge! Side note: I used the 1st edition rules while planning this adventure, though Cubicle 7 updated and released 2nd edition back in April. This Side Quest will be playable with both versions of the rules.
This week’s Side Quest features a trek through an alien jungle to reach a hidden ruin fortified by a madman. This adventure is suitable for a party of Tier 1 or 2 characters with the IMPERIUM Keyword.
Free Warhammer Wrath & Glory One-shot: Armageddon Now
An Imperial Guard Colonel named Walter Kurtz discovered a ruined temple dedicated to Chaos deep within the jungle death world of Galmor. It is there he became corrupted and turned his weapons against the planet’s governor-general and the Imperium. He guides a host of soldiers and miners and plans to bring down the Imperium one world at a time. The agents must search the jungle, find the ruins, and “terminate Kurtz’s command… with extreme prejudice”.
Background
The death world of Galmor, located within the Gilead system, is a source of frustration for the incumbent Governor-general. Galmor holds a variety of precious minerals sought by many, but much of it remains hidden by vast tracts of wet swamps and steamy jungles. Some years ago, a chaos cult grew among the miners, and the Imperium sent Colonel Walter Kurtz to deal with the insurrection. Kurtz’s actions were swift and brutal, and he was believed successful against the cultists. Months later, key production areas are being targeted with the same hit-and-run tactics Kurtz used.
Kurtz, now branded a heretic, wages a guerrilla war from his base hidden deep within the jungles.
Plot Hooks
- The Governor-general desperately calls out for aid from any nearby imperial (or Rogue trader) forces. The reward of money or precious ore is quite the draw from the beleaguered governor.
- Agents with the ASTRA MILITARUM keyword worked with Kurtz in the past and know what he’s capable of. If Kurtz manages to escape Galmor, his influence could threaten Gilead.
Jungle Exploration
Getting Started
It’s no simple task to fly an aircraft and locate Kurtz’s compound — dense foliage and heavy mist cover Galmor’s surface, which prohibits any kind of aerial reconnaissance. The Governor-general advises that the agents begin their search on Galmor’s sector 18b, located several hundred kilometers away. Transportation is provided in the form of half-track trucks: loud, massive machines that use tank-like treads to slowly traverse the jungles. These vehicles are incapable of stealth but fare well in Galmor’s environments. The Governor-general also provides up to four Survival Kits to agents who need them.
Mining Facility
Travel takes roughly six bumpy hours via half-track, after which the agents disembark outside a mining facility surrounded by thick jungle trees. A handful of technicians are diligent in their work and tend to inoperable, flame-scarred drilling engines. When asked about the attack, most respond that there was no warning, only the sound of gunfire and explosions that destroyed a majority of the drilling equipment
and armed personnel. One technician knows more than they let on, and a successful DN 2 Insight (Fel) test reveals that the tech nervously looks towards the jungle towards the east. Pressing the tech with a successful DN 3 Intimidation (Wil) test causes them to fearfully reveal that they turned off the automated defense systems around the mine before the attack. Despite this, the tech does not know the exact location of Kurtz’s compound but directs the agents towards the east. The tech’s mental state degrades quickly and they collapse to the ground babbling incoherently.
The Jungle
Embarking out into the jungle is no simple matter. Colossal trees block out the sky above, pools of murky water hide aquatic perils, and wildlife large and small swarm at the smallest sign of weakness. Exploring on foot is ill-advised, though the agents can requisition a single half-track truck that carries the entire group plus their equipment. Agents can rent smaller, quieter double-seated half-track bikes with a DN 4 Influence test. While these bikes may be smaller and more exposed, it is easier for them to travel quickly through the jungle. The upcoming journey takes less time to complete if the entire group rides half-track bikes.
The agents must make five successful DN 3 Survival (Wil) tests to locate Kurtz’s compound. If the agents have access to the large half-track truck, add +1 bonus dice to their Survival (Wil) tests. If the agents ride the smaller half-track bikes, add +1 bonus dice to their Survival (Wil) tests and reduce the required successes by 1. Roll a d6 on the event table below if any complications are rolled during these tests or spend 1 point of Ruin to trigger an event.
Jungle Events
- The group becomes terribly lost within the looming trees. The next day’s Survival (Wil) tests are made with -1 modifier.
- A sudden downpour catches the agents off guard and washes away some unrestrained equipment! Roll a d3 — each agent loses a number of ammo reloads equal to the die rolled.
- Explosive trap! A Krak-grenade tied to a tripwire explodes and immobilizes one vehicle. A successful DN 4 Tech (Int) test fixes the vehicle and proceed the next day. Failure to fix the vehicle may cause the agents to continue on foot, which could add further complications.
- The trees are speaking Galmorian. 5-6 Cultist Troopers (see below) ambush the agents as they trek through the jungle. They fight until they suffer half casualties and flee into the trees.
- We are the hunted. A Galmoran Sabertooth Vulpine (see below) stalks the agents and attacks as night falls.
- Fortune favors the bold! Against all odds, the agents stumble upon machine tracks that lead deeper into the jungle. Add +1 bonus dice to the next day’s Survival tests.
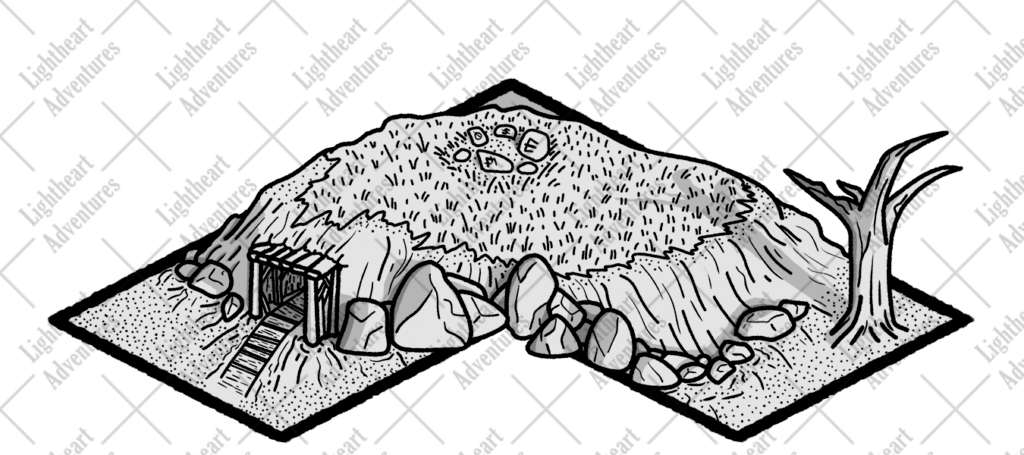
Ruins Overview
Strange stone ruins jut from the swampy waters as the agents travel deeper into the jungle. Most of these are simple standing stones carved with obscene symbols upon their surfaces. Any agent inspecting these symbols closely must make a DN 1 Corruption test.
The stone ruins increase in number and size until the agents find themselves approaching a rudimentary encampment. Ramshackle buildings and vehicles mingle with the ruins, and armed sentries stand atop rockcrete walls. A frontal assault without backup is suicidal, so the agents need to find a way to either distract the guards or sneak in. Here are a few suggestions:
- A DN 4 Tech (Int) test turns a half-track vehicle into an improvised explosive. Setting this bomb off a distance from the camp draws a number of guards away. Sneaking in after this requires a group DN 2 Stealth (Agi) test.
If the agents go for full stealth, they must succeed on a DN 4 Stealth (Agi) test, otherwise 1-2 Cultist Troopers discover them. Melee or Silenced weapons allow agents to deal with the troopers quickly and quietly, or else they run the risk of alerting the entire compound. One of these guards holds a keycard that allows entry into the inner compound.
However the agents proceed, they approach the fortified walls of the inner compound within time. Three anti-air lasgun batteries sit atop a three-meter high plasteel wall covered in razorwire. A massive stone ruins rises into the trees beyond the wall — a looming presence in the dark jungle. A set of electronically-controlled doors rests between two batteries and opens as patrolling troopers enter and exit the grounds. Agents can either attempt to take a keycard from one of these troopers or sneak in while the gates close. Alternatively, savvy agents can attempt to unlock the door with a successful DN 4 Tech (Int) test.
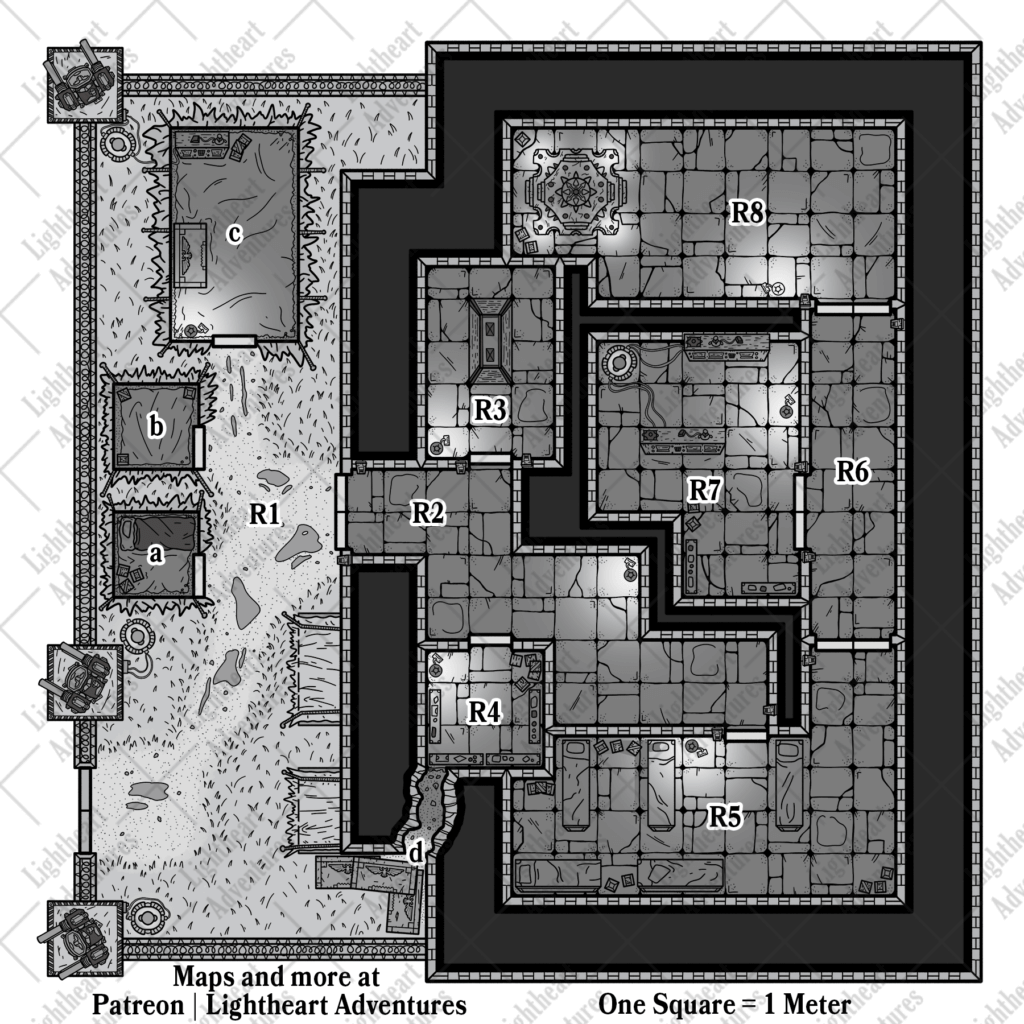
R1. Compound Grounds
Inside the grounds agents see three tents (a-c) to the north as well as tarp-covered crates. A muddy path leads to another set of electronic doors built into the stone walls of the ruins. Three Cultist Troopers stand and chat outside the largest tent (c). Attempting to enter the ruins requires a keycard or a successful DN 4 Tech (Int) test. Failure causes the doors to auto-lock, preventing any from accessing the interior of the ruins. Shifting an Exalted icon reveals that Kurtz’s keycode was used less than an hour before to enter the temple.
a. Sleeping tent: This six-by-six meter tent holds a single bedroll and a few personal effects. It is relatively dry and comfortable, but there is nothing of value within the tent.
b. Trap tent: This tent’s floor collapses if anyone steps within. Agents walking inside must succeed on a DN 4 Awareness (Int) or Investigation (Int) test to spot the trap. Failure to spot the trap triggers a DN 3 Agility test to leap out of the way, otherwise they suffer 1d3 Mortal wounds after plunging two meters onto wooden spikes below. There is nothing of value within the tent.
c. Command tent: A single chem-lamp lights the three by five meter tent, revealing a single munitions crate and a data station towards the back. Two Cultist Troopers have their attention drawn to the station. One of the troopers holds a keycard needed to enter the ruins if the agents do not already possess one. The data station is the key controller for the auto-turrets located nearby, and a DN 2 Tech (Int) test will cause the turrets to deactivate. Searching the weapons crate reveals two lasguns, a shotgun, and four sets of ammo reloads.
d. Hidden passage: A short, narrow passage hides behind stacks of imperial-marked storage crates. A successful DN 5 Awareness (Int) or Investigation (Int) test allows an agent to spot the tunnel. Moving the storage crates is an easy proposition, though large characters or agents wearing bulky armor (such as Astartes or power armor) will not be able to crawl through. The tunnel leads to a small storage room (R4) within the ruins.
Ruin Interior General Features
The ruins interior is solidly constructed of a stone not found within Galmor. The ceiling in each room reaches up to 4 meters tall, and overall, the room sizes vary. Most rooms have a chem-lamp or two that provide bright yet sickly light. Sound is somehow dampened within these walls, causing Awareness tests using sound to have a -2 to their roll.
R2. Ruin passage
The cramped halls are lit with a single chem-lamp sitting in one corner, casting ominous shadows along the walls. A feeling of dread emanates from the door to the north. None of the plasteel doors are native to the ruin — a recent addition from the current inhabitants. The doors are unlocked as long as the cultists remain unaware of the agents. Any prior complications outdoors could cause the ruins to go into high alert and lock the doors. A successful DN 4 Tech (Int) test opens these three doors in this situation.
R3. Artifact Room
The feeling of dread doubles as the door opens into this small chamber. A pitch-black stone obelisk stretches from floor to ceiling in the center of the room. Deranged carvings of sigils and script cover the surface of the obelisk and describe arcane practices involving the warp. Any agents who spend more than a passing moment in this room must take a DN 5 Corruption test, as their eyes somehow cannot look away from the obscene edifice. Any attempt to dismantle the obelisk with traditional weapons fails automatically, but explosives (such as a Krak grenade) are enough to damage it.
R4. Storage Room
Kurtz’s men use this room to store goods that need to remain out of the wet jungle.
Equipment: The shelves hold mostly useless items, but agents can find one autopistol with a red-dot sight attached (Rare 5 – this upgrade grants a +1d bonus to ranged attacks with the weapon), three sets of ammo reloads, and one set of preysense goggles (Rare 4 – Preysense goggles render the user immune to penalties due to darkness and fog).
Hidden passage: Agents with a passive Awareness of 4 or succeeds on a DN 4 Awareness (Int) test notice crumbling bricks behind one of the shelves. Moving the shelf aside reveals a narrow passageway leading outside.
R5. Barracks
Five simplistic bunk beds fill the largest chamber yet within the ruins. A number of Cultist Troopers equal to the number of agents plus 1 reside here. If the agents succeed on a DN 3 Stealth (Agi) test they can catch the troopers unaware. Barring any explosive weapons, the sound of any fighting does not travel further than the adjacent rooms.
R6. Narrow passage
No chem-lamps light this dark hallway, only the light from the wall-mounted data slates provide dim illumination. Both doors within the hallway are unlocked.
R7. Intelligence
Two large data stations installed within this room provide a connection for Kurtz to monitor Galmor. Two Cultist Troopers monitor the room and will attempt to flee if overwhelmed. Most of the data displayed on the screen show traffic patterns and shipping lanes for Galmor’s mining operations. Agents can purge this info with a successful DN 2 Tech (Int) test, which will severely weaken Kurtz’s operation. Physically destroying the data stations achieves the same effect, but is considerably louder.
R8. Kurtz's Chamber
Kurtz (see below), along with four Chaos Cultists (see below) meditates within this chamber. Kurtz kneels upon a blood-stained Chaos altar and rises to face the agents as they enter the room. His face is serene and calm as he addresses the party — he speaks quietly, but his voice is amplified so that they all can hear.
Kurtz tells them he knew the Governor-general sent the agents to kill him long before they set foot on the planet. The mysteries of the warp unravel before him, and he is willing to share that vision with the agents, to join with him and overthrow the “corrupt” Imperium and the corpse-god Emperor. At this point, each agent must take a DN 2 Corruption test at this blatant blasphemy. Firing upon Kurtz or the cultists immediately draws their rage, and they will attack in kind. All cultists fight to the death, whereas Kurtz remains on the altar, firing at range.
If slain, Kurtz falls to the ground, mutters “the horrors, the horrors…” as bluish flame engulfs him. His body immolates without heat, and from the flames, a Blue Horrors demon (see below) pulls itself out of the corpse. The demon cackles and capers as it attempts to kill any remaining people (agents and cultists both) within the ruins.
Epilogue
Five simplistic bunk beds fill the largest chamber yet within the ruins. A number of Cultist Troopers equal to the number of agents plus 1 reside here. If the agents succeed on a DN 3 Stealth (Agi) test they can catch the troopers unaware. Barring any explosive weapons, the sound of any fighting does not travel further than the adjacent rooms.
Appendix
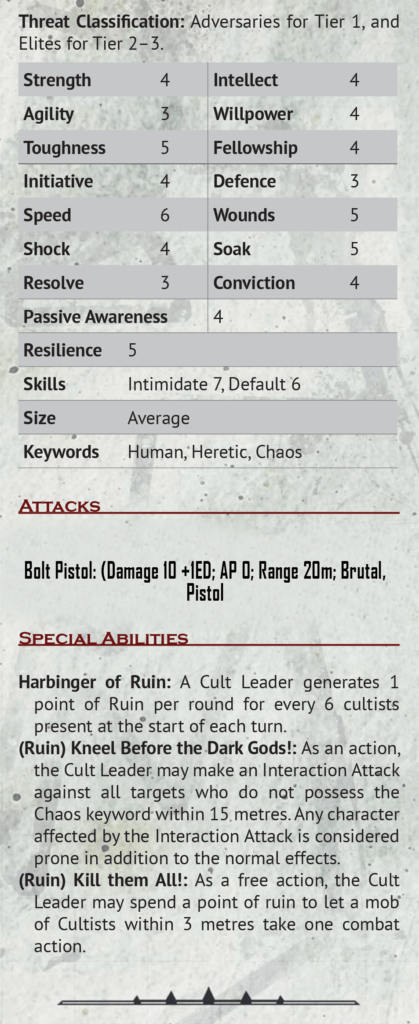
Kurtz – Uses stats of Chaos Cult Leader with modifications. The following table is from the 1st Edition of Warhammer Wrath and Glory with an alternative weapon.
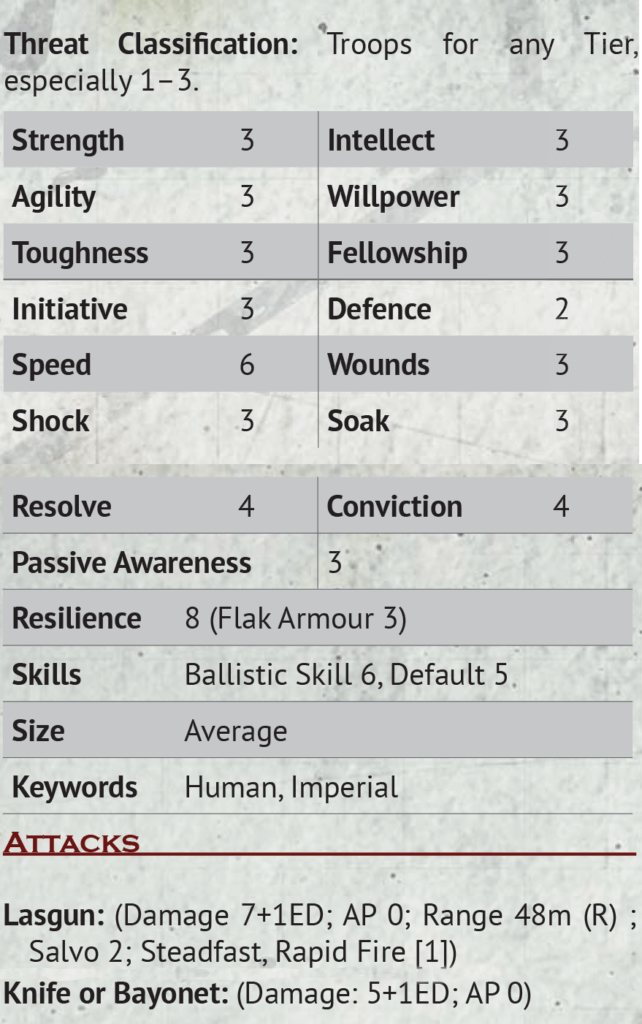
Cultist Troopers – Uses stats of Astra Militarum with modifications. The following table is from the 1st Edition of Warhammer Wrath and Glory with frag grenades removed.
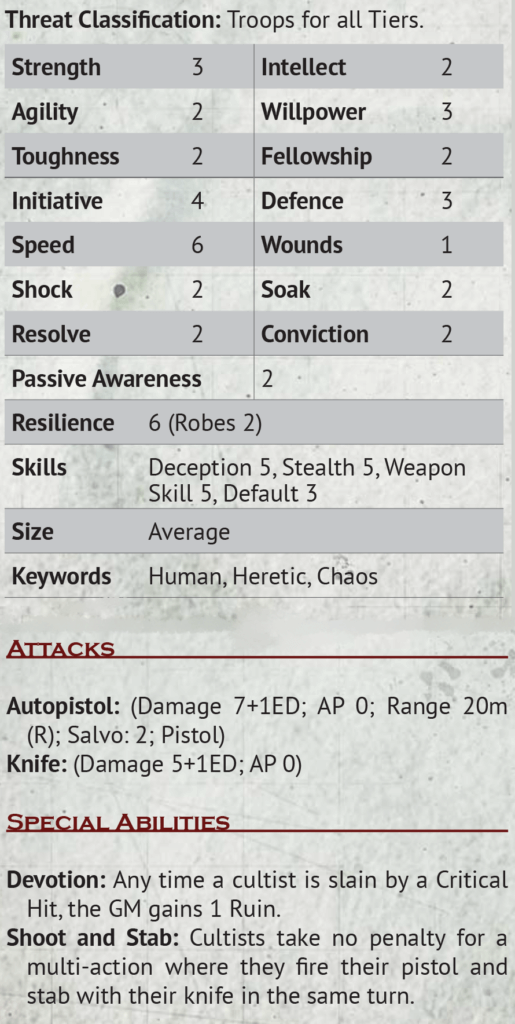
Chaos Cultists- The following table is from the 1st Edition of Warhammer Wrath and Glory.
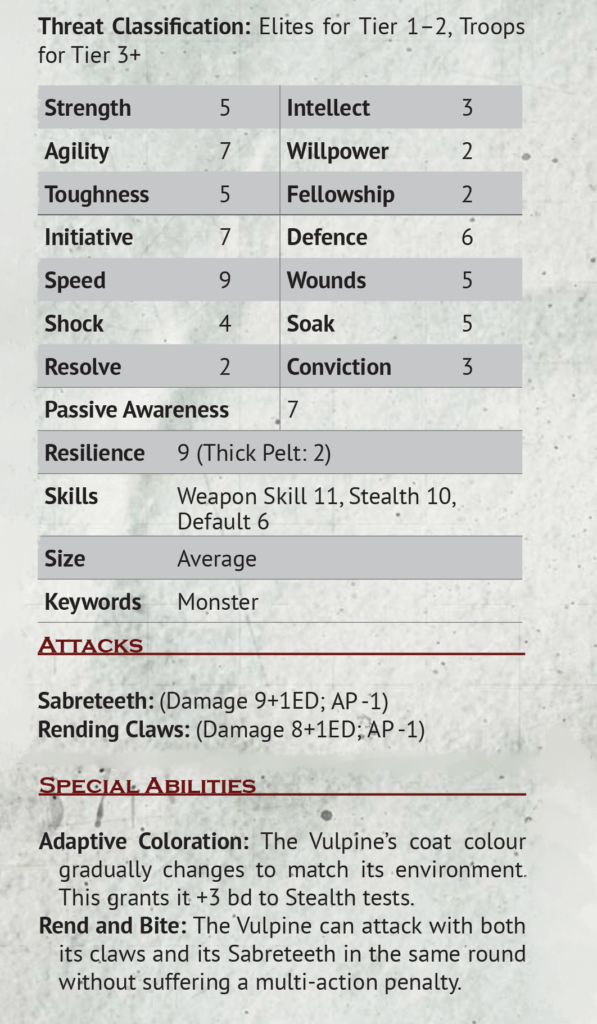
Galmoran Sabertooth Vulpine – Uses stats of the Ostian Sabertooth Vulpine. The following table is from the 1st Edition of Warhammer Wrath and Glory.
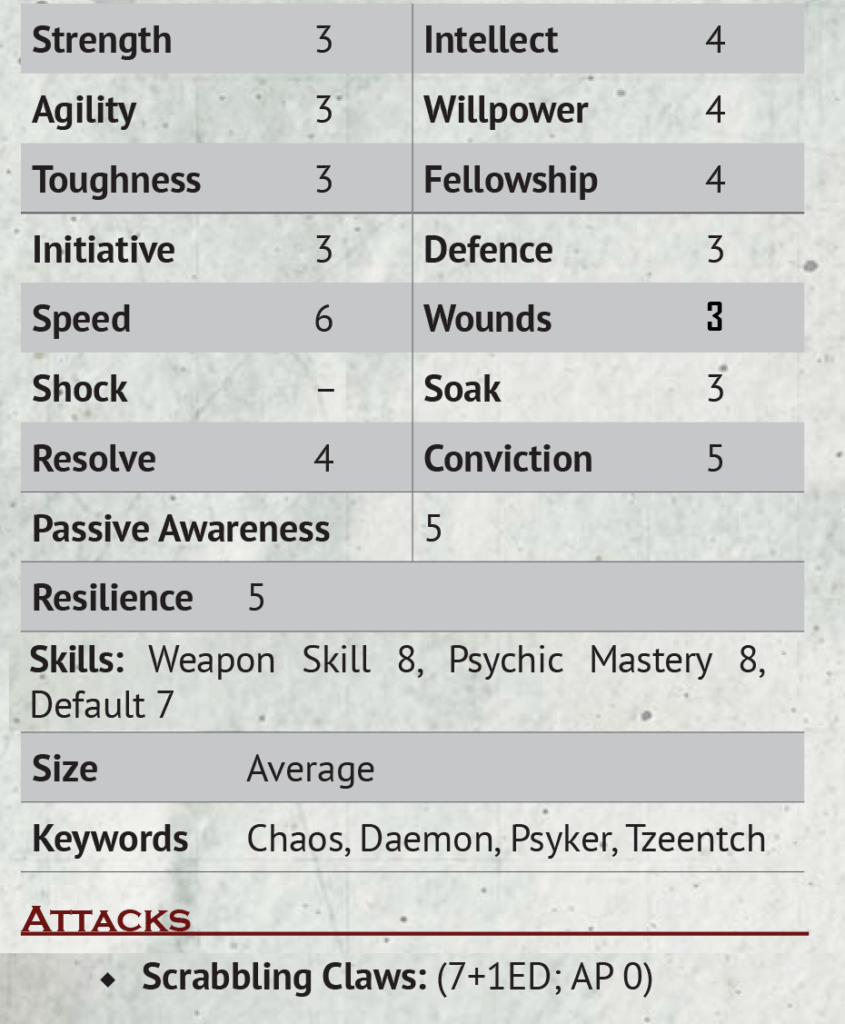
Blue Horrors – The following table is from the 1st Edition of Warhammer Wrath and Glory
We hope you enjoyed this free Warhammer Wrath and Glory One-Shot! From here it’s up to you to decide if you want to explore the ramifications of Kurtz’s actions or the other chaos ruins on Galmor. We would love to know if you use this Side Quest, so please drop a comment here on the blog, on Twitter, Facebook, Instagram, or Discord to let us know how it went! If you want a printable PDF version of this Side Quest, it is available (along with our other Side Quests, maps, and more fun things) exclusively on Patreon. Lastly, if you enjoyed this adventure, consider checking out our longer campaigns and map packets on our Shop page or grab another free one shot on our Side Quests page.
Happy Side Questing!


Excellent job! Very well done. Enjoyed it immensely. I love how you put the sabertooth in to remind us all to “never get out of the boat.”